Showing posts with label beeswax. Show all posts

November 20, 2023

Beeswax Wraps & 3 DIY tips that work!

DIY beeswax wraps that work! A 5" wrap covers a Oui jar perfectly. A 7" wrap is more than ample for an 8-ounce ramekin.
Determined to make a substitute for plastic cling wrap and foil, today's post is on things I learned from making beeswax wraps. In case you've got the crazy idea to make your own, too, I hope I can save you some trouble.

Tip #1: Wraps made with pure beeswax alone are brittle and don't cling at all. If you're a beekeeper with a Warré Hive, they are fantastic between the top bars and quilt!

Tip #2: A little oil provides flexibility, so your wraps bend without cracking. Think of a wax/oil version as a foil substitute. It's bendy and holds its shape but doesn't make an airtight seal. Stay away from cooking oils with short shelf lives. I like meadowfoam, which is a North American native wildflower. It has a longer shelf life than jojoba oil, and I can use a tad less oil.

Tip #3: Resin is what puts the cling in DIY cling wrap. If you're wondering about using propolis, the resin-like substance made by bees, at the amount needed to create cling it imparts a strong odor and bitter taste to wrapped items. And I mean really bitter. Invest in pine resin in powder form; chunk form takes too long to melt, which degrades your wax/oil. A 1-pound bag of pine resin will make about 12 dozen wraps. (If you find a smaller bag for less than $15, please let me know!)

If you're ready to embark on making your own, my formulation makes an extra sticky blend for beeswax wraps that actually work! I'm providing volume measurements for convenience but, especially if small-batch crafting, I highly recommend a quality digital scale like a MyWeigh, which is accurate to a tenth of a gram.

DIY Beeswax Wraps Recipe

Makes ~(5) 12"x12" wraps.

60 g. beeswax (about 1/2 c. pastilles)
20 g. pine resin (about 2 1/2 Tbsp.)
12 g. jojoba (1 Tbsp) oil

Melt everything together using a water bath, stirring until completely blended. I use a milk frothing pitcher set in a small sauce pot over medium heat, and it takes about 15-20 minutes to make sure the resin is completely dissolved. The resin sinks to the bottom, so you'll know it's fully dissolved when you don't feel your stirring tool dragging anymore. Double-check that there aren't globs stuck to your stirrer, though.

Resin needs a good amount of heat to melt. Maintain a simmer.
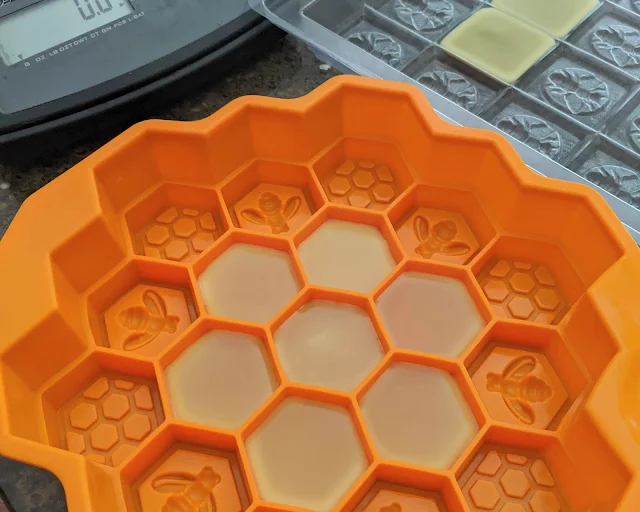
Instead of brushing the liquid mixture onto fabric, I pour it thinly into molds. Once set, I pop out a few wafers and iron them into fabric that's in-between pieces of parchment paper. You want to barely saturate the fabric, but if you put on too much just use the iron to push the excess out past the fabric edges (but still inside the parchment sheets). Using the next piece of fabric to absorb it, it's almost zero waste and cleanup is a breeze. This is especially why I love the wafer/iron method.

A "cake mold" like this one is about $9 on Amazon. Clean each well with a cotton swab and rubbing alcohol for a polished finished piece.

Beeswax Wraps Wafers

Quick to melt, three wafers will treat a large piece of tight-weave fabric. My first beeswax wraps were made out of an old but high-quality cotton percale pillowcase, upcycling at its best. An economical option is remnants at your local fabric store (mine is Joann), or buy quilting squares or fat quarters are cute and fun.

I prefer to wax my fabric first and cut it to size afterward, which minimizes fraying.
Use a rotary cutter or pinking shears if you have them. Either will reduce fraying but you'll always have loose threads…don't pull them! You can hem the edges if you're sewing the fabric into a baggie.
It's easy to pinch pieces off the wafers, to ensure even coverage. You move the pools of wax with your iron so you don't have to be perfect or precise. (Be sure to place a piece of parchment paper underneath and on top.)

Because my friends say things like, "You should sell these on Etsy," you can buy my Beeswax Wraps Waxing Wafers, four for $4.

etsy.com/shop/BackyardBeeHiveDIY beeswax wraps waxing wafers, premixed

If you'd rather not spend $15 for resin and make 144 wraps, then these ready-to-use waxing wafers are for you! If you have year-old wraps that have lost their stickiness and need a refresh, these waxing wafers are for you! Or if you have beeswax wraps that weren't sticky enough in the first place, these waxing wafers are for you!

My Beeswax Wraps Waxing Wafers are four for $4 (plus cost to mail). Four wafers will make up to nine (9) wraps with plenty leftover for touch-ups. Depending on how you cut it, from one quilting square you can make:

  • three 7x7" (small) and two 10x13" (medium) wraps
  • 3 small, (1) 7x13" (rectangular medium), and (1) 13x13" (large) wrap
  • 3 small and 1 extra-large 13x20" wrap (perfect for covering a lasagna pan with handles)

Remember, you're not limited to squares or rectangles. I find rounds to be the most versatile. The cast-offs make terrific fire starters, and I mean terrific. 🔥 Or don't cut the quilting square at all, and sew it into a plastic-free baggie. The possibilities are endless. 

DIY Beeswax Wraps Waxing Wafers

BONUS TIP for making it to the end of this post: Making DIY, and indeed using, beeswax wraps is messy business. Rubbing alcohol will clean up drips and smudges, and hand sanitizer is your skin's best friend.

October 26, 2023

HOW TO: Using Waxing Wafers to make DIY Beeswax Wraps

Waxing wafers are beeswax, resin and jojoba oil in convenient Ready-to-Use premixed form. Use to make new food wrappers, or to refresh ones you already own. Available now in my Etsy shop

Whether you're reducing plastic use or substituting foil, my formulation is extra sticky, so your DIY beeswax wrappers will actually work!

SUGGESTED USE

  • Small Wrap (7 x 7 inch): 1/2 wafer
  • Medium Wrap (13 x 13 inch): 2 wafers
  • Large Wrap (16 x 16 inch): 3 wafers
  • Jumbo Wrap (20 x 20 inch): 4 wafers
  • Infinitely Useful Gift Wrap (25 x 25): 4 wafers – using saved ribbons to tie up presents, you can make even larger wraps that become gifts themselves. Gifts that keep on giving!

DIY Beeswax Wraps Waxing Wafers, 4 for $3 plus cost to mail

What You’ll Need

  • DIY Beeswax Wraps Waxing Wafers from my Etsy shop
  • tight weave fabric, preferably 100% cotton or other lightweight natural fiber
  • a clothing iron
  • two pieces of baking parchment, heavy duty if available
  • heat-safe working surface like an ironing board; I use a 13x18" Epicurean cutting board
  • scissors (or pinking shears for less fraying)
  1. Lay a sheet of parchment on your work surface.
  2. Lay your fabric on the parchment.
  3. Set your iron to cotton (medium-high).
  4. Pinch off pieces of waxing wafer and distribute them over your fabric. Not too much! It's better to put on too little, getting the dry spots in a second pass
  5. Cover with another sheet of parchment.
  6. Press the iron over the the wax pieces, spreading the pools of melted wax outward. Try to stay within the confines of the parchment.
  7. Peel off and let cool (about 30 seconds). Your beeswax wrap is ready to use!

Clean as you work. Use hand sanitizer to clean sticky fingers before handling your iron.

Watching the wax melt and move under the parchment is the fun part!

Don't forget to turn off and unplug your iron.

TIPS

  • If you do use too much, iron another piece of fabric over the extra-waxy spot and it'll absorb it. 
  • Cutting to size after waxing the fabric results in less fraying than cutting beforehand. Hemming the edges is not recommended unless you're sewing a plastic-free baggie.
  • When finished, save the parchment. The wax that has cooled on it is ideal for refreshing work-weary wraps.
  • Use rubbing alcohol to clean the handle of your iron, and other waxy smudges.
  • Use hand sanitizer to clean tacky fingers.

USE & CARE

  • Store unused waxing wafers in a cool, dry place. Best if used within 2 years.
  • Unlike plastic wrap which clings readily to glass and ceramic, beeswax wrap functions a little differently. Beeswax wrap clings more to itself than whatever you're wrapping. Pleat and press it onto itself until you're happy with the seal.
  • If you were generous with the wax application, you'll find waxy residue on your unwrapped items. A little rubbing alcohol will clean that right up, but don't use it on anything painted or varnished.
  • To clean your wraps, wipe gently and rinse with cool-to-tepid water. Use a very small amount of dish soap if necessary. Do not scrub. Hang to dry.

I hope this helps you on your plastic-free journey. Leave any questions/comments you have below.

https://backyardbeehive.etsy.com/listing/1551131475/diy-beeswax-wraps-waxing-wafers-premixed

In complete transparency, sometimes a container has a funny shape so I use a rubber band to secure its wrap. It enables me to stay plastic-free, and that makes me happy.


March 28, 2016

#makeitmonday: Spoon Butter

I traded my extra tomato seedlings and ALL my mason jars — HURRAY — for some beeswax. It's pretty rough, having only been rendered from the comb. I'm 99% sure this wax was processed through a solar wax melter but the beekeeper's method differs from mine. Mine comes out cleaner ;)

At the moment, it's too wintry to use the solar wax melter, but I've got a project I want to do now, so I'm using a lined crock pot to melt and clean the wax. The pot has a couple of inches of hot water in it, so trapped honey can dissolve out. Bits of brood comb are too light to sink, so don't expect them to precipitate out. At best, they'll be at the bottom of the block where they can be scraped off. I'm adding only about a pound of wax, in chunks, to the pot. The goal is to melt an amount that, when cool, is manageable. Most recipes call for pretty small amounts, and if you're serious about crafting, it helps to have a digital scale that measures in grams.

Reynolds liners are awesome, because you can still use your crockpot for cooking food afterwards.

Spoon Butter

If you have butcher block in your kitchen, use a wood cutting board or wooden spoons, then you need spoon butter. Also known as wood cream, wood wax and board butter, it will lengthen the life or all your pieces by hydrating the wood fibers and providing a protective coating. It takes just two ingredients to make spoon butter: beeswax and a carrier oil. And you can make it in under a half-hour.

The wooden spoon is from World Market.
I am a ServSafe® certified chef and have a kitchen philosophy that goes something like this. It's okay for me to kill me, but it's not okay for me to kill you. Safety first. A lot of DIYers use food-grade mineral oil (and then sell 2-ounce jars of spoon butter for $6). There's some hub-bub about FGMO but I really don't have the inclination to find out what the controversy is. I'm just showing you the technique, really. When you make yours, please educate yourself on the ingredients and use what you are comfortable with. If you're going to make spoon butter to sell, just remember: When it comes to your customers, it's okay for you to kill you, but it's not okay for you to kill someone else. Always safety first. 

If I had it, I would use fractionated coconut oil. It is a liquid form of coconut oil that is extremely stable (doesn't go rancid). My bottle of sweet almond oil was down to the dregs, the perfect amount for this demonstration. Normally odorless, it was at the end of it's useful life and needed to be used, which is alright because I'm not selling it and it's okay for me to kill me. For a butterlike consistency, a good ratio is 1:3.5 by weight, beeswax to carrier oil. Use less oil, just 1:2, and you can put it in a twist-up container. Handy! You can also use 76° coconut oil, trés trendy, in which case a good ratio is 1 part beeswax to 3 parts oil (use a scale). When I do get my hands on fractionated coconut oil, I'll show you how to a lotion-like wood cream.

I love how the beeswax gives the water white almond oil a golden glow.
For small-batch production, heat the ingredients directly in the jar, set in a pan of simmering water. Stir to distribute the beeswax evenly. When completely melted, remove from the water bath. Do not remove earlier thinking you can heat the oil less and let carryover heat finish melting the wax. Yes, heat speeds up rancidity but, especially with a small jar like this, there may not be enough thermal mass to do the job. Beeswax melts at about 145°F and it needs to be melted completely to ensure it is evenly dispersed.


When fully liquid, it's definitely too hot to add any essential oils, which are optional. Rather than by aroma, choose an oil that provides antibacterial, antiseptic or antimicrobial properties. Orange oil is popular, as it's an antibacterial, antifungal and smells great, but it is delicate and volatilizes at 153°F/67°C. If you don't have an instant read thermometer, a visual gauge for when it's safe to add your EOs is when you see the bottom start to set. (If you're making a larger batch in a heatproof pitcher to pour into several individual containers, wait until the edge of the mixture starts to set before stirring in the EO then pour immediately.) Work quickly to ensure the EO is evenly distributed before the butter sets.


To use, rub a small amount of spoon butter into the wood. Some people use a soft cloth but I like to use a nitrile glove. The warmth from your hand helps the butter penetrate better, and it's 100% lint-free. Dry ashen wooden will darken in color, and take on a little shine. It's not necessary to treat the entire handle of your spoons. I actually prefer the grippy feel of dry thirsty wood, but it's good to treat at least a few inches up from the bowl, any part that gets submerged in hot liquids. Let the spoons sit for a few hours, a warm spot will encourage deep hydration, then buff away any residual butter. The next time you use your spoons/cutting boards/butcher block, you'll find them water-repellent and just a pleasure to cook with.

Available in my Etsy shop.
www.etsy.com/listing/265525114/pure-beeswax-sunflowers-and-queen-bee

February 09, 2016

I Wish Someone Woulda Told Me BEFORE I Started Beekeeping… #2 and #3

#2 Beekeeping takes up a lot of space.

The beehive pictured in my last post is empty and needs to be stored somewhere. It's a Warré hive, which has a smaller footprint than a Langstroth, which has a smaller footprint than a horizontal Top Bar Hive. My TBH is already parked on the patio (under a foot of snow) so think, think, think. But you're not storing your hive, are you? The amount of space a beehive needs for storage is a very different thing from how much space an active beehive needs.

I wish someone woulda told me when I was just getting started, to forget about the footprint of a hive, to think about airspace. A backyard gets real small when thousands of sting-capable bees are flying. If you've got a birdbath or a water feature in your garden, those are theirs now. There'll be a constant flow of traffic to and from, so the air in-between is theirs, too. The flight path'll be right about eye level, which makes mowing the lawn interesting. If you've got not one, but two hives, double your trouble. At some point, you might have someone offer to host your second hive on their property. They'll tell you they have a nice suburban lot with the perfect corner for a beehive, and they really want to help #savethebees but they just don't have the time with their toddler and the dog. Yep, people really think you can stick a beehive in the corner and nobody's gonna notice. It's #GoodToKnow that in the case of a stinging incident – and bees will chase you unprovoked – suddenly that 6 ft fence that you are so happy to have because it meets the zoning ordinance to keep bees, will seem a problem. Suddenly you will feel trapped in that 1/8-acre fenced-in lot and the house will seem so far away.

Airspace isn't the only consideration. Think about where you'll store your stuff, like a noncollapsible i.e., bulky, veil or propolis-y gloves, sticky hive tool, stinky smoker, extra used top bars that have a waxy/honey-y strip on them… Got lots of plastic bins that ants can't get into? Will they stack? Need shelves? Everyone's got a basement, garage or shed, right? What about the stuff you don't want to store in a dark spidery place? Like the candles you'll make.


#3 Beekeeping creates a lot of side projects

Many people think that a beehive produces honey, and that's it. SO wrong. In a good year, a hive does make surplus honey but there aren't a lot of good years when you're in a drought. Beginning beekeepers might be lucky if their bees put up enough honey to make it through their first Winter. What new beekeepers might find themselves with a lot of, particularly TBH beekeepers, is wax. Even with a deadout, you end up with wax from combs that you didn't have a place to store but couldn't leave in the empty hive because without bees the wax moths would come and destroy it. I'll tell you why I said "new" beekeepers in a bit, but phew that was a mouthful.

If you lean towards "sustainability," you might have this problem. I have a "crafting" drawer which is fully dedicated to all things beeswax. Chunks of raw unfiltered beeswax, beeswax in pellet form, beeswax in blocks. Then there are candle molds, wicks, wick tabs/pins and actual candles. There's also a selection of random containers for lip balms, salves and lotions, all of which I make using beeswax. Propolis tincture is another "product of the hive" that I make, so there are dropper bottles for that, too. I never planned on making all these things, but I was raised by a waste-not want-not mom, so there you have it. Problem is, now I've got shelves full of equipment and drawers full of supplies, and ultimately the reality is waste-not have-no-space-or-money-left. We're getting ready to downsize to a townhouse, and I've no idea what to do with the honey jars I won in a "Honeybee Photo Contest" — oh yeah, you'll get into photography, too. You won't just take photos of honeybees, there'll be photos of metallic green bees, long-horned bees, leafcutter bees… all on flowers. Lots and lots of flowers. You'll even go to the nursery, just to see what flowers they like. And of course you'll come home with any that a bee chose to alight upon. Anyway, I tried to give the jars away, but you know what? Beekeepers are a weird lot. You'd think that offering four cases of super cute, skep-shaped jars FREE would be met with an enthusiastic, "Yes, I'd love them. Thanks!" But, no, they prefer mason jars, which brings me to #GoodToKnow #4: The Mason Jar Philosophy.

July 20, 2015

Rendering Beeswax in a Homemade Solar Wax Melter

We have two solar wax melters, both styrofoam coolers that we're keeping out of the landfill. The small one is for white wax, which we typically only have in small amounts. The big one gets a bit hotter and works better for old brood combs, which are notoriously difficult to get the wax out of even during one of our relentlessly sunny Colorado days. The chamber of commerce likes to brag about our 300+ sunny days, but what they don't mention is that you fry in our rarified air and the mile high altitude kills you with UV radiation. There are no shade trees to escape the sun because a) we only get 14" of rain a year (which sometimes comes all at once) here in the "subalpine desert" and b) the few that do manage to eke out a living have their tops snapped off by winter storms. But I digress. I shouldn't complain because unrelenting sun is what makes solar melters work. But wouldn't you know it? There've been clouds on the days I've been able to set the melters out and the yield's been like pulling teeth. If you don't see a sharp shadow it won't work, even if it's 98°F. Beeswax melts at about 145°F so you need the sun to power what is essentially a solar oven.

Tips for Success… after the jump.
Sometimes the wax forms interesting shapes and sometimes it's a flat disk. It depends on how hot the water in the catch pan is.

December 13, 2013

how to make candles with beeswax straight from the hive

This is how Marty Hardison makes candles with beeswax from his Top Bar Hives.


If you need equipment, I can recommend GloryBee to you. They're also a good source for beekeeping equipment, from hive tools all the way to honey jars.

March 07, 2013

Styrofoam Solar Wax Melter

This is a drawing of a solar wax melter which is made from a foam ice chest with a piece of glass or plastic on top.

Our wax melter is based on Paul Magnuson's design (above).

I generally process beeswax in two stages. The first, in the solar wax melter, is a wet phase, and the second and any subsequent meltings are done dry, without water. Sometimes I find the wax is tacky, and I have trouble getting it out of my molds. This tends to happen with older comb, or wax rendered from brood combs. Either the propolis and other impurities are the problem, or the wax may be partially saponified.

According to Dave Cushman, to avoid saponification of the beeswax in the wet phase, the water should be acidified with lemon juice, lime juice or vinegar (one or two teaspoons per pint of water). When I have enough wax accumulated, I'll melt some with and without acidifying the water and will post on the differences.

March 29, 2012

Beeswax Blooms

Bloom is a sign that your beeswax is really pure.
As beeswax ages, often a white, powdery substance will appear on the surface. Don't fret, it's not mildew, it's called "bloom" and it's actually a completely natural occurrence and a sign that your beeswax is really pure. It doesn't affect the quality of the candle or the burning of the candle, and most people just leave it alone, feeling that the "bloom" gives the candles an antique or textured appearance. If you want to though, you can just wipe it off gently with a dry cloth, or remove it by heating the candle lightly with a hair dryer. - from about.com

These wax flowers are made from honey cappings that were melted and filtered twice, once in the solar melter and then again into the mold. It will be melted and filtered one more time, and made into candles for Earth Hour.

More Interesting Reading: Cleaning Beeswax and Beeswax: It's All about the Cleanliness

September 15, 2011

Top-Bar Beekeepers Meeting: Beeswax Candles

In my experience, the crush-and-strain method yields about about one pound of wax for every 20lbs of honey harvested. When you're just starting off and haven't harvested much, you won't have a lot of beeswax to deal with. If you're looking to craft something homemade then soap or hand cream, which call for very small amounts of beeswax, are good options.

Once you've harvested a few times and have more soap than you know what to do with, the easiest thing to do with it is make candles. At the last meeting of the Top-Bar Beekeepers Association, Marty Hardison showed us how he makes candles using wax harvested from his hives.

Marty has something like 30 hives, so that's a lot of wax! While we didn't end up with samples from last month's honey harvest (surplus honey is his retirement money), each member of the Top-Bar Beekeepers Association took home two candles, one of each size.

The key features of beeswax candles are that they are dripless and smokeless. Everything the honeybee makes is super-efficient. I wish I could post their aroma... the scent of honey and propolis and the life of a hive are indescribable. If only someone could develop a scratch-n-sniff widget. How awesome would that be?

OK, back to reality. If you plan on making candles, here's some math to help you determine how much wax you'll need. The 6" taper and the 10" taper weigh 1.5 and 2.75 oz., respectively. The molds cost about $40 each. Brushymountainbeefarm.com has some that are similar to the ones in the slideshow. There's a variety of wick sizes to use depending on candle shapes, and we used a #2 braided wick, which is easy for first-time candle-makers to work with. I've never shopped Blossomland, but they carry 2/0 wicking for beeswax tapers. I have shopped and like GloryBeeFoods and Dadant. They sell lots of other beekeeping stuff and service is good, too.