Showing posts with label Marty Hardison. Show all posts

October 15, 2024

Deep Top Bar Hive, designed by Marty Hardison

The Deep Hardison Hive

Here is a new picture of the deep Hardison Hive. Marty has enjoyed 100% survival rates in them, and he's fine-tuned their construction. The plans to construct the original Hardison Hive are included in The Appropriate Beehive. On clicking through, you will need to request access to the document.

"There is nothing fancy about adding 4 inches to my standard hive. I just cut 4-inch wide boards of the same wood the hive body was built out of. Then drilled down the center of the boards deep enough to screw them into the existing hive body. But I also screw the end of the boards together. This enables my bees to have a larger enough cluster to survive Denver winters."

As you can see, he also adds protection over that wide seam. Nothing fancy. Once the bees propolize the inside, the seam will be wind- and water-tight. If you have any questions for Marty, just drop a comment. I'll make sure he gets it!

P.S.: Marty always says he's doing a good job as a teacher if his students want to do something contrary to his way. It means they're thinking. So if I were building a deep hive, I think I'd add holes as upper entrances (like Wyatt Mangum does) and some flashing just under that new face plate to create a little awning.

July 28, 2024

Marty Hardison's Appropriate Beehive

Here's a sneak peek at Marty Hardison's redesigned top bar hive.

A new hive design, adjusting for climate change. Building specs to come.

He's having better success getting colonies through winters with this revised appropriate beehive.

Appropriate Beehive?

ap·pro·pri·ate
🔈 /əˈprōprēət/
adjective: suitable or proper in the circumstances

The NOAA climate forecast for Colorado predicts more heat, more drought, and greater amounts of winter snow, changes which have implications for colony survival. Good beekeepers give the bees what they need, when they need it, so Marty's adjusting what constitutes appropriate.

Having observed colonies in bee trees that have been surviving for years, whose combs are long not wide, he's made his hive 4 inches deeper to allow the bees to build longer combs. The new design still uses 16 1/2" top bars, which allows for interchangeability between hives and makes this design appropriate for both the bees and the beekeeper.

Marty isn't actively teaching the craft anymore, so he and I have been working on updating his booklet, The Appropriate Beehive. An instrumental guide, it includes building plans for the original Hardison Hive. On clicking through, you will need to request access to the document but if you do, I will send you the updated PDF as soon as it's available. I'm not sure I can promise instructions on adding the additional four inches to the top, but the new edition offers more details on keeping bees in a top bar hive that beginning topbar beekeepers will appreciate.

September 13, 2022

The Accidental Lepidopterist: Monarch Butterfly Edition

UPDATED in 2025 with MORE PICS!

Freshly laid Monarch butterfly eggs are greenish/white. This cream/yellow one is probably about 3 days old.

Mid-August and my garden is a sandy strip of nothing-going-on. We've had weeks of 90s and oppressive humidity, and the stubs of golden alexander and parsley left by the Swallowtails are struggling to grow back. Yet I keep finding fresh eggs and caterpillars on them! Off to the nursery we went to find host plants. The herbs were wiped out so I headed for the clearance tables hoping to get lucky. There was nothing for Swallowtails but I found a table full of Tropical Milkweed (Asclepias curassavica) for $2.09. It was Buy2 Get1 but A.curassavica isn't native. Virginia put the VA in inVAsive so I picked a small 2 1/2" pot that, once home, totally surprised me with two Monarch butterfly eggs. I scrambled online to learn as much as I could, as fast as I could. A monarch butterfly egg hatches in 3-5 days, the shorter time with warmer temperatures, so the clock was ticking.

When mature, the egg doesn't turn solid black like a swallowtail's. Only the tip, the head of the larva, does (unless it's been parasitized by Trichogramma wasps). I think the freckles are what will eventually become tentacles.

The first thing I learned was that eggs laid after mid-August comprise the 5th generation of the year, the "super generation." It's the one that makes the incredible journey southward, traveling hundreds or even thousands of miles to overwintering grounds. Recently listed as endangered, I felt doubly pressured to ensure their survival.* 

I hope this helps you if you're in the same time crunch!

First meal: its eggshell (chorion).
Day 1 as caterpillars. I have to say, raising Monarchs is very different from raising Black Swallowtails. The method is the same: feed them their host plant, enable them to pupate, release a butterfly. But the experience is at a much faster pace and the details — the clues that tell you what to do next — are all different. 

To begin, newly hatched Monarch caterpillars are impossibly small, and it's frustrating trying to see if anything is happening. Turns out it isn't much, and they are completely boring at first. 

While black swallowtail caterpillars are almost as small, they offer a lot more opportunity to be found, probably because their survival strategy employs a little bird poop mimicry. You'll find them on leaf stems, topside of leaves, underside, on the flowers… and you can start each day with a little game of Where's Waldo. Monarch caterpillars, with no camouflaging strategy, have to be more discreet so spend almost all their time hiding on the bottom side of leaves.

Do you see both Monarch caterpillars? Click/tap the photo and scan the enlargement for a black head and pale green body.

Day 3 as caterpillars. First molt! They'll go through 5 just like swallowtails do. New black stripes make them a little easier to find, but I still needed a magnifying glass to find them. That's how I noticed little brown spots on the undersides of the leaves. Rust is a fungal plant disease that is host-specific (won't jump to other plants) and doesn't harm the caterpillars. It is less of a problem for plants when moisture is managed properly. Nurseries tend to both crowd and overwater plants, so hopefully this issue resolves itself especially now that it's in my kitchen.

I'm fairly certain the nursery mislabeled the plant I bought. The plant tag showed bi-color blossoms, but with fully orange blossoms and fine hairs on the small leaves and stems (visible in the macrophotos), this narrow-leafed milkweed is most likely Butterfly Milkweed (Ascelpias tuberosa), which is native to eastern and southwestern North America.

An example of their skeletonizing method of eating. Click/tap the photo for an enlarged version. You'll be able to see the black nubs that will become the front tentacles.

Swallowtails neatly eat entire leaves and stems but early instar Monarch caterpillars need to avoid releasing the sticky white sap milkweed is known for. At their size it can glue their mouth parts shut, so they don't touch the leaf veins. They eat only the soft sections in between, leaving the plant looking a mess. I'm the relentless deadheader and weeder kind of gardener, so I'm having to learn to accept imperfection as perfection. 

Day 5 as caterpillars. All instars have multiple looks; the photo above and below are both 2nd instars! A Field Guide to Monarch Caterpillars (Danausplexippus) by Karen Oberhauser and Kristen Kuda is a terrific reference to determine which instar your caterpillar is.

A 2nd instar monarch caterpillar has two triangular spots behind the head. It's beginning to get yellow stripes.
 Day 6 as caterpillars. Third instar! With bright yellow stripes and prominent front and rear tentacle nubs, they're finally starting to look like Monarch caterpillars. This is a rapid growth stage that's easy to see.

Half a centimeter in the morning.
Doubled in length in one day!
Day 7: Third instars are less wasteful but still won't eat the central leaf vein. One site I referenced said they will snip the central vein to stop the flow of sap. Then they can eat all of the leaf after the snip.

Rather than skeletonizing, week-old caterpillars eat more leaf but not the midrib.

Day 8: Through the 3rd instar, my little $2 plant seemed plentiful for both caterpillars. But now they're eating full leaves including the midrib, which channels Milkweed sap. Eating leaves down to a nub, I began to really regret not taking advantage of the Buy2 Get1 sale.

Just like Instagram, I'm experiencing upside down posting with Blogger. 🤷🏽

If you're desperate, older caterpillars, 4th or 5th instars, can eat slices of cucumber, zucchini, or butternut squash. You can also offer watermelon rind but feed them these alternatives only in a pinch. Pesticides will kill larvae so choose organic produce, and peel off anything that might be waxed.
A 4th instar caterpillar looks like a big juicy meal to predators, so now is a good time to load up on the sap. It's full of the toxins that make Monarchs mildly poisonous. Several sources said a single caterpillar eats an entire plant so I did the newbie panic thing of driving from nursery to nursery looking for milkweed plants, only to find none. Or a sad excuse for a plant, merely sticks and leaf remnants complete with more eggs or caterpillars. Already the accidental lepidopterist, I didn't need to buy more problems; I just needed food.

While late instar caterpillars can eat alternative foods, they'll render the caterpillars non-toxic to predators. In a process called aposematism, a predator learns to associate a warning signal, such as bright colors, with a bad experience and avoids all similarly-marked prey in the future. So it's important to feed your Monarchs milkweed only, for the protection of future generations.

Day 10:

A monarch caterpillar spends 3 to 5 days in its 5th instar, the shorter time with warmer temperature.
Day 13: As it turned out, I panicked for nothing. They abruptly stopped eating and kept walking off every leaf I offered. Monarch caterpillars do not do a purge, the telltale sign that a Swallowtail is ready to pupate. I had to take the refusal to eat & walkabout as signs and left them to do their thing, whatever it might be. After a few hours, they'd taken the j-formation side-by-side.
Hanging in J-formation, opposite to Swallowtails which suspend themselves head up, feet down.
Day 14:
Fifth instar Monarch caterpillar, preparing for its final molt.
Like the Swallowtail, they spend a full day in the pre-pupal position, not moving, and there are indicators that the final molt is imminent. When you see the caterpillar straightening out and tentacles go limp, it is ready to begin the final molt to chrysalis.
Dorsal view of the final molt to become a monarch chrysalis.
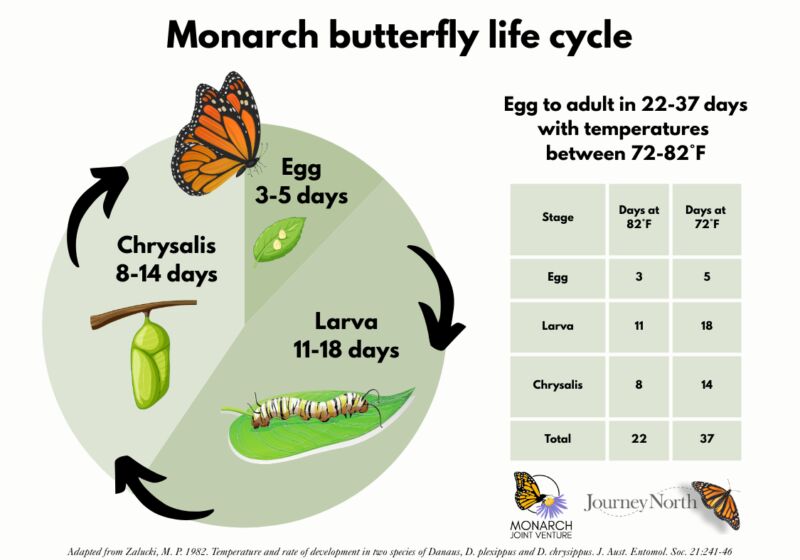
Day 15: A monarch can stay in its chrysalis for up to 15 days! Less time in warm temperatures. Here's a chart that illustrates the difference 10°F makes.

 
1-day-old chrysalis, wing veins already visible.

Day 22: The evening of their 7th day as chrysalides, they turned really dark. I am beginning to think all butterflies time it so they eclose early in the morning, to warm as the sun rises. A few hours in the sun's warmth helps their wings dry and harden.

Late night after 7 days as chrysalides, the famous orange and black wings clearly visible.

Day 23: As with our Swallowtails, we awoke to find an already eclosed butterfly clinging to it's empty chrysalis, its sibling ready to burst out of its own.

Good morning 8-day old monarch chrysalis and brand new butterfly!
I don't know if it is just the migratory generation that does this because they need extra-strong flight muscles for the journey to Mexico, but ours beat their wings pretty regularly and slowly, giving us ample opportunity to determine their sex. These are both males.

Monarch wings are translucent. The stripes visible when the wings are spread open (the dorsal side) are the same as those when their wings are folded (the ventral side). This is different from swallowtails, whose wing spots in open and closed positions are different, and you can only tell the sex when they're open.

The wings being translucent surprised me.

The outlook was for rain (as it often is here) so we held them overnight. In the morning, they could see the outdoors just on the other side of the window and were eager to get out. So eager that there was no placing them on a flower for a beauty shot, like I do with our Swallowtails. The instant we brought the hamper out, they flew out the opening, up into the forest canopy, and thus began their incredible journey to Mexico.

July 09, 2020

Warré Hive from the Bottom, Up

Beehive for Sale: Local Pickup Only.

This is a virtual your of my cedar Warré hive, all the parts and accessories from the bottom up. It was built by a professional carpenter, not home-made, and is sure to be compatible with any Warré components added in the future. I conferred with a few fellow beekeepers and $250 is a fair price, as the offering is for more than just a beehive. Here's what's included, from the bottom up.

The very bottom is a "deep sump" bottom board. It's better than a standard one because a) it's screened so mites fall through and away from your bees, and b) an extra couple inches makes it extra difficult for the mites to crawl back onto your bees. The extra depth also gives the bees space to beard inside the hive. There's a slot for sliding in a mite counting board (which can double as a solid bottom in the winter). It wouldn't be a bad idea to put the bottom board on a hive stand, especially if the hive will be overwintering in a spot that gets a lot of snow. That's a 4-inch flower pot, to give you a sense of scale.

This is a hive body. (I think this one is pine.) It has three holes drilled into it, currently plugged with corks, giving you the option to give your bees the option for upper entrance(s). Mine preferred the uppers. Successful beekeepers give the bees what the bees need, not what the beekeeper themselves would like. If this hive body is used as a super, these entrances enable your bees to "dump and run." They can deliver nectar without having to travel through the brood nest for efficient honey production. I've experimented with a variety of top bars. Whether paint stirrer, popsicle stick, tor riangle guide, they all work equally as well. This kit contains more than the 8 needed per box, should you ever decide to perform a single-comb harvest.

This is a hive body with an observation window. Brass hardware secures the shutter over the (plexi?)glass. Look through the window and you'll see the first three top bars are outfitted with short side bars (standard Langstroth parts). This is nontraditional but I like that the sidebars are "self-spacing" so you don't have to nail the top bars in to maintain bee space. Proper bee space encourages the bees to build straight comb. Also, most municipalities require that combs be inspectable so these are "to code."

This is a piece of brood comb tied into one of the "frames." It is a very valuable resource that can be used to attract a swarm in the Spring, encourage a package of bees to not abscond, or to encourage bees that have decided to stay put to build straight comb. Comb and lived-in woodenware are the most enticing things you can offer your bees. BONUS: this is all chemical-free!

This is an eke, sometimes called a Mountain Camp feeding rim, made out of teak. It provides about a 2" deep space to lay in solid feed like candy and pollen patties. You could also put a gallon-sized baggie feeder in the space.

But this hive top feeder is a much better (and plastic-free) way to give your bees a large amount of liquid feed, in a quick fashion. Fewer disruptions are best for any colony, but especially a colony that needs a hand for whatever reason.

This is a queen excluder. A honey super would go on top of this when your colony is ready to produce excess honey. It's a completely optional piece of equipment, but it keeps the queen out of the the hive body on top so she can't lay eggs there. Most people don't like brood in their honey. As you can see, the screen has propolis on it. The strong scent of propolis is very encouraging to new resident bees. It tells them that bees chose to live here before, so it must be a good home.

This is the quilt. The propolis screen (rolled up in parchment paper) should be laid between the uppermost hive body/super and the quilt. It limits how much the bees can gunk up the canvas and prevents them from securing the quilt to the hive body. The canvas needs to remain breathable so it can vent moisture up and out of the hive. The box is filled with shredded aspen wood, also known as excelsior. It should never feel damp. If it does, your colony has an extreme moisture problem.

The gabled roof "telescopes" down, completely covering the quilt. I stuffed a nylon garlic bag into the ridge vent to discourage wasps from building a nest in the roof. The large side vent is not screened but that might be a smart modification. [Side note: one thing that makes me love Warrés is the options they provide via modifications and accessories. Horizontal top bar hives are set-it-and-forget-it. Forget about making mods easily or outfitting them with accessories.]
A hive tool is necessary for hive inspections. This is a standard 8 or 9" tool (sorry, I'm too lazy to go find a ruler). I never got a chance to use my cheese slicer, so it's brand new. If/when your bees build comb that connects to the box below, a hive tool won't help you. But cheese wire will slice through the comb, allowing you to separate the boxes with minimal damage to the combs. Just make sure to slice from the direction where all combs get cut at the same time, otherwise you might cause a domino-effect and have a disaster on your hands.

So there you have it. A two body Warré Hive with accessories, ready for bees. Price is negotiable. Let's talk!
  • deep sump bottom board
  • (2) hive bodies, one with observation window
  • all the top bars you'd need
  • quilt
  • propolis screen
  • gabled roof
  • teak solid feeding rim
  • hivetop syrup feeder
  • queen excluder
  • bait comb
  • hive tool
  • cheese wire

Related Posts: You may be interested in my Primer posts which include suggestions on How To Get Bees.

December 19, 2019

Gifts for Beekeepers Under $10, Under $5

Today is THE last day to get your gifts sent in time for Christmas, according to the USPS. Be sure to select Priority Mail service not USPS 1st-class. All orders $35+ ship free but since all of my handcrafted goods are UNDER $10 that could be hard to get to. Just for my bog readers, the code BUZZABOUTBEES will give you 20% off storewide. There's more than these nine items, so be sure to look around in the shop. Several listings also have style options, like twist-up vs glass jar (spoon butter and wood cream) or Ultra vs Honey Bee balm.


In addition to my handmade stuff, I'm also selling off my bee books and other beekeeper-related items like a honeycomb-embossed honey dispenser, all at discounted prices (because we're getting really close to putting the house on the market). Because I'm a cook and a gardener, and a bit of a photographer/geek, too, you'll have to sift through some non-bee stuff.

But head on over to eBay using this link http://bit.ly/backyardbeeebay and remember… choose PRIORITY MAIL if you're buying for Christmas.

Candle-making kit complete with a pound of pure, clean beeswax from Marty Hardison (alone worth the $15 price on eBay).
Thanks for supporting handmade by shopping my Etsy and for providing some gas money by shopping my eBay. Message me with any questions!

TAGS: bees, beeswax candles, beegan, beekeeper gifts, beekeeperlife, Salves & Balms made with beeswax, natural moisturizer, cuticle softener, nail treatment, spa gift, beauty balm, honey, petroleum-free, plant-based

August 15, 2017

How to make $100 blogging about bees + Backing Up a Bee

BLUF: Use Blogger Sure you can set up a visually beautiful SquareSpace or Tumblr, but when it comes to long format blogging, WordPress and Blogger rule. Both provide free blogging but only Blogger lets you monetize your blog gratis.

Not only that, with WordPress.com (which is very different from WordPress.org), you have to pay a $30 premium annually to run an ad-free blog. One reason to pay the premium is that you have no control over the ads that run, and some of them will go against your principles. The blog I run on WP is for people with MdDS, which most often rears its ugly head after a cruise, and WP kept running cruise line ads because its algorithm understands keywords not meaning.

By default, Blogger does not run ads on your blog, no upcharge involved. It's one of the reasons they've had my loyalty since 2008. Another reason to love Blogger is that through the power of AdSense, also a Google product, when you let ads run you earn money! You control the size and type of ads that runs, where they appear on your blog, and even do some blacklisting. I don't let pesticide or exterminator ads run on my site, for example. Mostly you only earn pennies per ad, sometimes just one, but if you consistently write quality content and your blog sees regular traffic, the pennies add up. When they add up to $100, Google sends your first payment.

I think I have two readers so it took me 9 years to earn it, but my check is in the mail! Don and Julie, sorry about serving up ads to you. To make it up, for an ad-free future I highly recommend the AdBlock extension. It's free but I like it so much I have donated to them, while working in the advertising industry.

Nine years of blogging and 357 posts. That works out to $11.11/year or $3.57 per post. Unfortunately, considering the investment I've made over the years to provide the consistent, quality content mentioned earlier, in reality I'm quadruple digits in the red. The things we do for our bees, right?

Speaking of, here is the long promised video of Marty Hardison administering a live bee sting so that I can get back into the business of keeping bees. I recorded it in slow-motion for you but YouTube is serving it up in real-time. Sorry for that, and for it not being closer in. I was recording with my phone in my left hand and an ice cube in my right. I was able, however, to grab a still of the stinger being ripped out of the bee, which you can see over on IG.

For the record, I don't recommend taking a sting to the calf (or any muscle-y area), but I would not have been able to record a live sting to my bingo wing. The things we do for our readers, right?

I arrived at Marty's house confident that 4 years of allergy shots had lowered my venom sensitivity and indeed, initially, I had very little reaction. No pain, no itching, barely a welt. A few hours later I had a bit of a cankle. This is classic of a late phase reaction but this type of swelling is considered "large local" or in other words no systemic reaction. Yay! I'm so close to keeping bees again, I can taste it. And of course it tastes sweet.

I'm pretty sure the swelling was because a) not enough fatty tissue to delay the venom reaction, b) we stared at the stinger after it was autotomized for a few seconds, then c) we did the one thing you're supposed to not do, and that was squeeze the venom sack that was still in my leg so I got a big dose of venom. A honeybee sting normally delivers 0.05 ml (sometimes written 50 μl) of venom but the venom sac has a capacity of up to 0.1 ml.1

Marty also put together some bees-to-go using queen cages but, well, I'll just say that what I did with them is a long story for another time. Combining my experience with VIT with how allergists are being advised to cope with the venom shortage, and the apparent fact that fresh venom is more potent than reconstituted venom, I'm going to wait two months between live stings.


1 Journal of Evidence Based Medicine and Healthcare, "A rare case of survival of honey bee sting victim with more than 1000 stings."

August 14, 2017

Question: I know wasps are deadly to bee hives and we have tons of them around…

Here is a reader question.
Hey Marty-- Mike Ray here! Hope you still look at your site! Adam is talking about bee keeping, so I started looking for you and finally found this place. I downloaded your PDF and printed it out. He and his family are coming over for breakfast, and will show your PDF to them.
One question I have: I know wasps are deadly to bee hives and we have tons of them around-- anything that might help keep them away from a hive? Contact me and i will give you a call-- would love to touch base with you.
Blessings, Mike
Mike, I forwarded your comment intact to Marty and hope he gets back to you soon.

This is high season for wasps and also the time when honeybee colonies are bearing the highest mite load. The driest June in 125 years followed by a very dry July adds another stress. If I had active hives, I'd have robbing screens at the ready.

August 07, 2017

VIT Report: Build Phase #2 Complete

Next week, I will have gotten 45 injections and driven 111 miles. It's my last week of build, sort of.

Next week, I will receive the target amount of paper wasp and mixed vespid antigens and will be migrated from weekly shots to monthly shots. Honey bee? That's another matter.

Can you believe there is still a national venom shortage? The nurse told me that the there was a contamination problem and the supply had to be destroyed. Honey bee venom has been on backorder for a while and there is no ETA.

Going through build this second time around has been a cake walk. I'm confident enough that the therapy is working to take my VIT into my own hands and will be stopping by my mentor's house for a sting. Scheduling is TBD but he's headed out of town shortly, so hopefully soon.

Meanwhile, here's a queen spotting challenge from the 10th annual Parker Honey Festival for you.
Find the Queen!


June 01, 2016

Marty Hardison on the Importance of Getting Stung

The video is actually titled, "Michael Palmer — Importance of Getting Stung" but he's not the first beekeeper to think that getting stung is important. This is what my mentor and his decades of beekeeping experience have taught him. Beekeepers and more often their non-beekeeping family members can develop a sensitivity to bee stings by inhaling bee proteins. Not exposed to the actual bee venom, their immune systems do not develop a tolerance to stings, but the protein is close enough to develop an allergy.

All that time I used to spend standing near my hives, breathing in the aroma — it's amazing — probably weren't good for me. In addition to my sting rate averaging less than one a year, my body was getting enough venom to activate my immune system but not enough to develop a tolerance.

Marty once found his wife unconscious and later his son developed an allergy. If I recall correctly, his son went through VIT like me but Marty administered live stings regularly afterward. We've talked about my allergy a few times, and now that my allergist isn't in-network Marty is going to teach me how to administer in-the-field venom therapy. He's going to "back up a bee" to administer a sting. Instead of having to grab a bee by its wings, Don from buddhaandthebees.net told me about using duct tape to snag a bee but I'm an experiential learner and really need to see it done firsthand to feel confident that I'm doing it right.

This month's injections are my last at the allergist, and then I need to be sting-free for 6-weeks before I can have my blood tested. If test results are A-OK, I'll have Marty show me as soon as he can after that.


Michael Palmer says "t cells" in the video but he means g. IgG antibodies are protective antibodies, and IgE are allergic antibodies.

You might be interested in: https://en.wikipedia.org/wiki/Allergen_immunotherapy

August 04, 2014

Another Honey Harvest


It wasn't our intent to harvest honey. Our goal was to to get our legs back under us while making sure the bees' needs were met. It's been a year-and-a-half since we worked a hive, so a quick look-see/assessment — to stay ahead of the bees — was our plan. Unfortunately Marty did that – just yesterday – so there wasn't anything for us to do. It turns out, however, that he'd acquired another small hive (same design as ours) that we could work. So we did.


December 13, 2013

how to make candles with beeswax straight from the hive

This is how Marty Hardison makes candles with beeswax from his Top Bar Hives.


If you need equipment, I can recommend GloryBee to you. They're also a good source for beekeeping equipment, from hive tools all the way to honey jars.