Showing posts with label primer. Show all posts

February 22, 2021

How many hives to start with. A little goes a long whey.

IN SUMMARY: Two's company. Or possibly a crowd.
Plus read through so you don't make the same "get two hives" mistake I did.

A little goes a long whey.

I bought my first beehive in 2008 and the second in 2012. I treated my first hive with tung oil a couple of times but quickly gave up on it. Even when blended with citrus oil to carry it deeper into the wood, tung oil stinks and still doesn't last, so there was no point. Afterwards, I paid no attention to my woodenware because rotting out in Colorado with it's mere 14-inches of rain (in a good year) just doesn't happen. But here in the DC area with its 43-inch average and "extreme precipitation events happening more frequently," my hives started to mold almost on arrival. Fuzzy white mold. Polka dots of black mold. The entrance side of my top bar hive was turning black. Ugh. Something had to be done. In the photos below (taken last Fall), you can see how my cedar Warré hive and pine Top Bar Hive look before and after being coated with PolyWhey, a waterproof stain that's ideal for beehives. Don't they look great?

Left: untreated cedar. Right: stained with PolyWhey made by Vermont Natural Coatings, in Golden Cedar (mostly).


Left: untreated pine. Right: Brackish Brown reminds me of my childhood violin.

PolyWhey is a stir-it and apply-it dream to use. It's non-toxic, barely has an odor, and cleans up with water. There's a LOT to like about PolyWhey, too much to write about here, and I've already not answered your question about how many hives to start with for long enough, so here's some bullet points.

  • It comes in over a dozen colors. Samples from Green Building Supply are really cost effective!
  • It penetrates the wood yet an 8-ounce sample size is plenty for a three-story hive with some left over.
  • Water sheds off the hives beautifully. Time will tell how long it lasts, and I promise to update the blog when/if they need retreating.
  • There is a temperature/humidity window. I treated my hives back in September when the rain stopped for a hot minute in Virginia.

A little goes a long way.

Finally, to answer, "How many hives to start with?" If your budget only allows for one, that's how I started. It's a totally fine way to start but when my singleton swarmed it sure would've been handy to have an empty hive on hand. Especially with the recent jacked up cost of lumber, woodenware is not cheap but it is a long-lasting, good investment, so buy two if you can even if you can only populate one at first.

Do not get two different hive styles; that's the mistake I made. Even though both of my hives are "top bar hives," one is managed vertically and the other horizontally. The differences are enough to stymie your progress as a new beekeeper, which in turn can stymie the progress of your bees. Remember, your job first and foremost is to give the bees what they need, when they need it. In fact, it's best to anticipate their needs and have a plan in place, plus contingency plans, so their progress never loses momentum. That gets tricky when you're simultaneously new to bees and working different style hives. The less you're standing around scratching your head wondering what to do, the better off your bees will be.

I'm realizing just now that you may be wondering about more than woodenware, and probably want to know how many colonies to start. Many veteran beekeepers say to start with two or even three but I don't subscribe to that, at least not for the typical backyard. The ability of the environment to handle a large bee population should not be ignored. Honeybees are not native to the US, so every colony you keep puts competitive pressure on the native pollinator population. Especially in suburban backyards, even if well planted, there are limited nectar and pollen sources for the hundreds of native bee species with similar dietary requirements, like bumble bees. Starting with just one or two hives limits the competition while giving you time to find your footing, and an outyard for when you're ready for more.

If you're already a beekeeper, how many hives or colonies did you start with? And are you a native bee keeper, too?

August 10, 2016

Vortex Bee Escape: What It Is and How To Use One

We've lent this to a fellow beekeeper two years in a row now. I'm wondering if this year he'll build one of his own. I doubt it, but now would be a good time since Labor Day is "traditionally" when we Coloradans harvest our honey.

A photo posted by etsy.com/shop/BackyardBeeHive (@backyardbee) on

It's an "escape board," a chemical-free way to clear a super of bees overnight. In the afternoon when most foragers are still out in the field, the escape is inserted below one or more supers, maze facing downward. In the evening when it's time to rejoin the cluster, the bees go down the hole and encounter the maze. The tunnels guide them out in a fairly organized stream, but if the super is really full of bees, it may take two evenings to clear it of bees.

After successfully navigating the maze, they generally don't try to do it backwards. However, if you leave the escape board on long enough, they will figure out how to get to their honey and you'll be greeted with stingers when you pull your supers off. And that's why my friend the procrastinator probably won't be making one of these. If you're interested in building one, here are the plans. http://www.dave-cushman.net/bee/vortexescape.html

If you're interested in seeing how we used this on our Top Bar Hive, then this is the post for you: The Great Escape

August 28, 2014

Primer: When to Feed Pollen Substitute?

Disclaimer: this post is a collection of a Notes to Self because feeding is a complicated issue and I can't remember anything unless it's written down.

In addition to carbohydrates from honey or sugar syrup, bees also need protein and minerals. Young bees need protein to strengthen their muscles, and also to produce brood food. Naturally, they get their protein from pollen. When it is in short supply, both the house bees and the brood they are raising may not develop to their full potential. In times of dearth, pollen substitute or supplement can help. Pollen Substitute is a pollenless combination of soy flour, brewer's yeast and milk powder. Pollen Supplement is just substitute plus real pollen.

Either substitute or supplement can be combined with honey or syrup to make it shapeable into a patty. The advantage of a patty over the dry powder is quickness of putting into the hive. Patties should be placed directly over the winter cluster. We don't have small hive beetles in Colorado, so the patties won't become breeding grounds for them. While easy and inexpensive to make on your own, I don't like having miscellaneous leftover ingredients hanging around for which I need to find both containers and storage space. Small house, remember?
1/3 of a pollen patty on top of sugar candy

August 09, 2013

The Beekeeper's Calender: When the Perseids Fly, It's Time to Think about Winter

The Perseid meteors can appear in any part of the sky, but all of their tails will point back to the radiant. Image copyright: Spaceweather.com

What you do in August may very well determine whether your bees survive the Winter or not.

Bees require four things to survive a Winter
A) a good queen
B) a population of healthy young bees
C) adequate food stores (both honey and pollen)
and D) protection from the elements.

July 04, 2013

Fixing Crooked Combs in a TBH

Today's post is in response to a search term that people are using to land here, hence the new label "because you asked." I confess, it's a compilation of experience and some information and images found on the 'net. But if there's one thing I learned from teaching, it's that people just love love it when you share with them the tips and tricks that work. (That, and that half the class will only hear 50% of what you said, whether you're mic'd up like Madonna or not.) So rest assured, I'm sharing good info with you. But before we get to Fixing Crooked Combs in a Top Bar Hive, let's start with some prevention.

Straight Combs Beget Straight Combs
Bees are pretty adamant about maintaining bee space, so the shape of one comb almost always conforms to the one before it. If you can get them started on a straight path, you'll really set yourself up for success with a TBH. To encourage the bees to build straight combs to start, I recommend using a follower board (AKA false back). When you restrict the bees' construction with a follower board, they are more likely to build straight combs. But don't cramp them, lest it encourage them to swarm. Make sure they always have 3ish top bars to build on, and monitor closely. Three bars is plenty of room for them to get creative, 2 bars less so and with 4 you're gambling. But give them what works for you. If you're nearby and can keep feeding in top bars, go with 2. If it's a bit of a drive to get to your hive(s) and you can't visit often, give them 4. Commonly the bees will curve just one end of the comb, increasing in likelihood with the length of your top bar. In other words, 19-inch top bars are more likely to have curved combs than 14-inch top bars. You can cut it off (it's usually honey, so enjoy it) and hope they do better next time, or you can cut the curved part free from the top bar and push it gently in line. It'll be a sticky mess, but the bees will reattach it.

When you have two properly spaced, straight combs, all you have to do is put one blank top bar b/n the two and you're golden. The bees will construct a new comb between them that will be straight. Repeat until the hive is full of straight combs. NOTE: Brood combs are the easiest to get the bees to build straight. Don't open the brood nest, though, unless you know the colony can keep an expanded nest warm. If you don't think the colony can manage that, then the next best place is where the brood nest meets the honey stores. This can work well, in the Spring or early Summer, to stretch the brood nest.

Crooked Combs Beget Crooked Combs
If you've got crooked combs, you've got two choices. Some comb can be "fixed" but others you just have to get rid of. It's important because once the bees go off-course, each subsequent comb is worse than the last. If you see it starting, nip it in the bud! If it's too late, bite the bullet and remove any comb you can't fix. (You'll be happy to have the bait comb when you're setting up swarm traps.) Fixing comb is Best done when the comb is fairly new, but not completely white... about 2 or 3 weeks old... Cut the comb next to the top-bar with a knife, push to straighten and pinch the comb onto the bar. Don't try to do more that 25 - 30% if [sic] the comb width at a time or it can all fail. It's best done when combs are light. Don't feed the bees for at least a week after the straightening. They have a habit of storing the syrup in the weak comb, which will collapse. Hope that helps! Bentham Bees

What To Do with Catawampus or Crossed Comb
Heavy honey comb should just be harvested.

If you have a bunch of straight combs built diagonally across several top bars (crossed comb), use a long knife (like a bread knife) to cut as much brace comb as possible, then do your best to lift all the top bars across which the combs cross, together. The goal is to keep the combs in tact so as to avoid a disastrous mess in the hive. Once out, cut the combs off as best you can, trim off the honey band, then have the bees reattach the combs to top bars for you. The image below (left) is a fast and secure way to hold the comb in place while the bees do this work. It's a viable route for those of us who don't have a table saw but do have access to a hardware store. Hardware cloth is way better than fiddling with string or rubber bands, which always slice into the combs, which never quite hang plumb. Rather than staples, I recommend using twist-ties to secure the wire cloth to the top bar (enables quick tool-free removal later). You will want to remove the wire cloth as soon as the bees have completed the reattachment. If you let the bees embed the wire cloth into the honey band, you'll have a sticky mess to deal with. Weather patterns, nectar flow, the size of your colony,… will all influence how quickly the work will be done. But you may be surprised how much progress they make in just a few days.

If you have the tools to split a top-bar, you can fashion a skirt-hanger type top bar like the image below (right) and rehang combs that way. Works with both tough brood comb and newer combs (as long as there's no honey getting squished).

If you take either route, drop me a line and let me know how it goes.

LEFT IMAGE: David LaFerney's "Simple Way" to tie in comb.
RIGHT IMAGE: Garret's "Split Bar" is a follower board of sorts, for fixing crossed comb.

Frame User? A Bee Rescue Cut-Out Tip from Instagram

May 07, 2013

clean hive top feeder

To clean any syrup feeder, dump out excessively moldy or fermented syrup, well away from the hive to avoid scavengers. Wipe the feeder with vinegar, rinse with water, and let dry. If you're using a hivetop feeder, sometimes there will be mold on the roof or inner cover above it. Be sure to clean that with vinegar, too.


You can use white or apple cider vinegar which has a nicer smell. For really stubborn molds (and they are, as you can see from the before-during-after mini slideshow), you can use borax to make a more effective vinegar solution: dissolve 1 T. in 1 c. warm water, then add 2 oz. vinegar.

See Her?

March 28, 2013

Reversing Hive Bodies

Interpreting Langstroth to TBH

"Bees normally move upwards through the honey in the hive during winter. In early spring, the upper deep back of the hive is full of bees, new brood, and food. But the lower deep-hive body front of the hive is mostly empty. You can help matters by reversing the top and bottom deep-hive bodies occupied and unoccupied brood combs."

"This reversing procedure enables the bees to better distribute brood, honey, pollen, fresh nectar, and water. Reversing gives them more room to move upward grow, which is the direction that they always want to move." — from Beekeeping for Dummies

Photo Credit: Backyardhive.com 
Reversing is usually done to prevent swarming of overwintered colonies. While you're at it, take the opportunity to get rid of old blackened combs. With the dandelion flow about to start, it's time to:
  • take out the oldest (and hopefully still broodless) combs near the front of the hive
  • push the brood nest forward
  • place empties (or fresh top-bars to build on) in the back.
In effect, reversing hive bodies. How does this help with swarming, you ask? It's supposed to remove any perception of being crowded by giving the bees space ahead. In a Langstroth hive the bees have been moving up all Winter, but in a topbar hive they've been moving backwards. So that's where we want to give them room to grow. We can certainly just leave them be, and they'll likely just reoccupy the empty combs they left behind, but we do have a 2-year old queen to consider. Colonies with older queens are more likely to swarm. Giving the colony topbars that need to be built out also helps suppress the swarm urge by distracting them with busy work. Sometimes it works, sometimes not. We shall see...

March 07, 2013

Styrofoam Solar Wax Melter

This is a drawing of a solar wax melter which is made from a foam ice chest with a piece of glass or plastic on top.

Our wax melter is based on Paul Magnuson's design (above).

I generally process beeswax in two stages. The first, in the solar wax melter, is a wet phase, and the second and any subsequent meltings are done dry, without water. Sometimes I find the wax is tacky, and I have trouble getting it out of my molds. This tends to happen with older comb, or wax rendered from brood combs. Either the propolis and other impurities are the problem, or the wax may be partially saponified.

According to Dave Cushman, to avoid saponification of the beeswax in the wet phase, the water should be acidified with lemon juice, lime juice or vinegar (one or two teaspoons per pint of water). When I have enough wax accumulated, I'll melt some with and without acidifying the water and will post on the differences.

December 14, 2012

Primer: How to Get Bees (Part III: Nucs)

Buying Nucleus Hives

Zia Queenbee Co. 4-comb Top Bar nucleus colony
What it is: a working colony comprised of 3-5 combs of bees pulled from an established hive and put into a mini-hive. A good supplier pulls combs of bees with brood in all stages, some real food (both honey and pollen), and a proven queen. She may be their mother but, more likely, a freshly-mated, spring queen is added, similar to a package. The bees don't want to kill her as badly though, because the brood distracts them. The supplier should maintain this new mini colony for several weeks, to make sure it's functioning. The equipment and work involved are why nucs are expensive. Price: let's just say $150 to make it easy.

Why You Should Want One: queen race of your choice, colony momentum is all forward. A nuc is a good way to get up and running fast, because bees are emerging even as you put them into your own hive, and the queen is actively laying. (With a swarm or package, first year beekeepers have to wait for combs to be built before eggs can even be laid. These colonies decline before they grow.)

When to Order One: Start shopping in November. Good producers are often sold out by February even though delivery won't happen until May (late April at best).

Problems with Nucs: Nucs take longer to produce and become available later in the Spring, like very late-April if you're lucky, but more likely May. Selection may be slim as there are fewer nuc producers than package producers. You are getting both bees and equipment, and that equipment is typically Langstroth. I don't know of a single producer of Warré nucs. I know of only 2 places selling Top Bar nucs within driving distance of Denver. (Without frames to support the wax combs, TB-nucs tend to be come-and-get-'em pickup only.) Both producers use Langstroth-length top bars so, unless you're running a Les Crowder style hive, you're probably going to have to trim the combs to fit your hive. These Top Bar Hive nucs cost $135-$155, about the same as Langstroth nucs. For the same money, you can have a Langstroth nuc delivered to Denver, and then just deal with the frames.

Here are the links to some top-bar nuc producers:
ApisHive.com - Durango, CO
Pottersranch - Mayhill, NM - 5-bars of high-altitude bees!
Missouri Bees
Zia Queen Bees no longer produces top bar nucs.

Got Framed Bees and a TBH?
If you're trying to jam frames into a TBH, you can cut off the side- and bottom bars then trim the comb to fit. Phil Chandler calls it the chop-n-crop method. It's destructive and disruptive, but it is fast and works. As usually, you need the right tools. Most foundation in nucs is plastic so you'll need heavy duty snips.

Next-best Option: an established hive!
If you are in the CO/NM area and have a couple hundred bucks burning a hole in your pocket, Grampa's Gourmet will have single deep established colonies available (probably in early May). Note: Brent Edelen's bees are honey producers… start shopping for a honey extractor now.

Primer: How to Get Bees (Part I: the Swarm)

What It Is: ±half of a colony's bees with their queen. FREE if you capture the bees yourself; at the swarm catcher's discretion depending on how difficult the capture is. Swarming season in the Denver area is heaviest in May/June, but you should be prepared March through July. (One thing to be aware of: late April is when most people start with packages, so some April/May swarms may not be swarms at all but  absconded packages instead.)

Why You Should Want One: a reproductive swarm is the by-product of a strong healthy colony. Although the swarm will depart with mostly young and eager wax-producers, expect the population to decline until replacements emerge in 3 weeks. This slow start gives a new beekeeper time to adjust to having bees. A nice big (soccer-ball size) swarm can fill a brand new top-bar hive with comb in just a few weeks, and the process is really cool to watch.

When to Get One: Start inquiring in February. Your bee club may not have a list started yet, but you want to be first on the list as they are first-come-first-served. Earlier swarms are best because they're more likely to have emanated from an overwintered colony, i.e., survivor stock.

How to Get One: First, get on the Swarm List of your local beekeeping club. Some are listed on the Colorado State Beekeepers Association web site. For really local bees, go to the nearest firehouse and ask them to call you the next time someone calls them about a swarm.
http://mistressbeek.com/category/spring/swarms/
Problems with Swarms: First there's the dying off part. Your colony goes backwards a bit before it starts to grow. Established beekeepers with drawn comb have an advantage over beginners with no resources. After population decline, the big bugaboo is unknown provenance. A swarm can be from a feral colony or someone's chemically-treated hive. I'm not condemning chemicals but nobody wants sick bees. Or maybe it's an afterswarm or after-afterswarm… There's no way to tell where they came from. The swarm we started with, conveniently captured for us, was on the smaller side and the queen failed very quickly. The president of our beekeeping club speculated that the bees weren't a swarm at all, but rather an absconded package. Experienced beekeepers would have requeened but we did not recognize the need until too late. Now that we know what 3lbs of bees looks like and have some idea of what is ab/normal behavior, we would restock with a swarm again but only if we know it's origin. A feral colony with proven overwintering skills would be ideal. Oh, one more thing: you should think about genetics. Colorado is too cold for Africanized genetics to be a concern, but it is a concern in Southern states.

Next-Best Option: the Package
http://www.dummies.com/how-to/content/how-to-obtain-your-initial-bee-colony.html

Primer: How to Get Bees (Part II: the Package)


Get ready to place your orders! I've seen quite a few pricing and availability announcements for 2013. Hopefully you've spent the last month or two learning about the honeybee life cycle and behavior. If not, just stop reading right now and buy a book. The one, I mean THE one, to buy right now for Top Bar Beekeepers, is Wyatt Mangum's "200 Top-Bar Hives: The Low-Cost Sustainable Way." While you're waiting for your book to arrive, today's posts are real-world rundowns on various ways of getting bees.

Package Bees

What You're Sold: ±3 pounds of bees, race of your choosing. You can buy Russian or Minnesota Hygienic (varroa sensitive), Carniolan (gentle), Italian (honey producers), etc. Price: a 3# pkg should cost about $100 ±$20. Be sure to have your hives ready and waiting by mid- to late-April.
http://www.dummies.com/how-to/content/how-to-obtain-your-initial-bee-colony.html
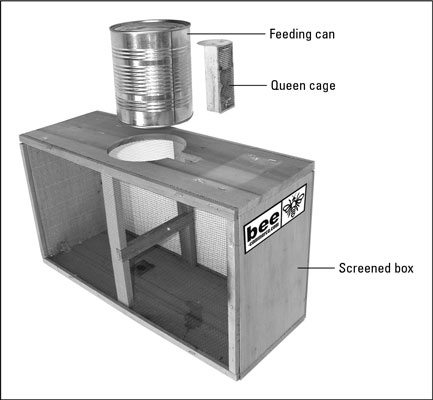
What It Is: These are bees that get dumped from one-to-several hives into a screened transport box. When there are 3# of bees in the transport box, the minimum needed to reliably get a colony started, the bee breeder puts a queen in her own box, into said box. A can of sugar water is inserted so the bees can survive a few days on a truck. Be sure to watch this video of packages being made up.

Why You Should Want One: you get to pick the race of your queen. Since the "colony" is broodless and combless, you have less concern about brood diseases like AFB. As with a swarm, the bees have lots of work to do, yet are dying off for the first 3 weeks. The work pace is well suited to beginning beekeepers.

When to Order One: Start shopping in November. Good producers are often sold out by February even though delivery won't happen until April.

How to Get One: beekeeping clubs often buy in bulk (i.e.: better prices). Some are listed on the Colorado State Beekeepers Association web site.

Problems with Packages: Apparently nurse bees cling to combs really well, so the bees that get funneled in are mostly flying bees (i.e.: the older, going-to-die-sooner bees). The worker bees' race is not what you have chosen; it is whatever the bee breeder has plenty of, from however many hives it takes to make 3#. They don't necessarily like each other but they're too freaked out to fight. (It's somewhat irrelevant, as what matters is the breed of the queen. Ultimately, she is what you paid for.) Of significance is that  the queen is not the mother to any of these bees and they want to kill her. The sugar water isn't much to live on and a road trip is very stressful. When the bees are finally in your possession, they get banged around, sprayed/smoked/sugar-dusted, and dumped again into a hive where everything again is new and strange. No wonder the queen you so thoughtfully selected gets superceded. It doesn't always happen, but often enough. They smartly wait until the initial die-off is passed and there are replacement workers on the way, but watch for supercedure cells pretty early on. (With new comb in a TBH, the bees are able to build them on the comb edges so don't assume they are preparing to swarm if you see them there. Packages are more likely to abscond than swarm.) The replacement queen they raise will have the paid-for genetics, but the drones she mates with will be who-knows-what. The colony she heads will be half the race you paid for, and half local (possibly Africanized if you live in the South). We would never start from a package again, unless it were free, preferably from a producer that does not participate in almond pollination.

Migratory beekeeping, a practice which exponentially increases interaction between healthy and infested colonies, is the primary source of package bees. Do not let anyone tell you that package bees don't introduce varroa mites into your hive as quite the opposite is true. With delayed treatment application, package bees can be heavily infested. 

Next-Best Option
the Nucleus

Apis Hive Co. is taking orders for packages and nucs for 2013! 

October 10, 2012

How to use a Hive Top Feeder: Part II

Filling in the Blanks — a Post for September in October
The Backyard is already set up for Winter, but I figured I'd post this "tutorial" even though it was meant for last month. September was a very busy month for me and BB, but better late than never, right? The weather's still warm enough to feed syrup, so here goes.
The cinnamon is NOT keeping the ants out of the syrup.
The slot in the feeder should be parallel to the combs below. This is an Ashforth-type feeder (has a beespace beneath) so it's not super critical, but the parallel orientation gives the bees the easiest access and enables them to take the syrup quickly. To ensure the bees will be able to drain it completely, pour only enough syrup to make a shallow pool in the feeder. Rotate the feeder or tilt the hive to make sure the pool is on the bee side. For your first feeding, only give them a small amount of syrup, in case there's trouble. If you need to clean out ants, you don't want to have to try to siphon off a gallon of syrup. A kitchen towel can easily absorb a cup or two, so start small and see how it goes. Speaking of trouble, a cache of syrup can set off robbing so I only fill the feeder in the evening, when everyone is at home in their own hive. I'm feeding because this colony is small, and it would lose in a fight over syrup.
Weatherstripping DOES keep the ants out.
This syrup is a little thin – you can tell by all those ripples – and in very warm weather will ferment. If you smell a sour aroma near the hive, it's likely white fuzzy mold is growing in the syrup. So again, don't put in more than you want to have to clean out. My syrup recipe is honey + water, about 3:1. If you're feeding sugar syrup rather than diluted honey, you're supposed to use a ratio of 2:1. Once you get a feel for the right mix, fill the feeder slowly to give the bees in the slot a chance to back up. Otherwise someone will get covered in syrup and drown. This type of feeder typically holds about a gallon.
The screen is a convenient place to put a mini pollen pattie.
It's always good to have some pollen around to supplement their feed. Pollen is what gives you "fat" bees capable of both surviving Winter and raising your Spring bees. My pollen pattie recipe is pollen + powdered sugar + a small amount of honey, kneaded together. The bees seem to like it. Either that or they're taking pieces of it to throw away. I'm inclined to think they like it because, after a few weeks of feeding them like this (with the roof on, of course), we observed lots of new bees orienting about the hive. Keep feeding continuously until they stop taking it, or until the bees begin to cluster for the Winter, whichever comes first. (Keep feeding continuously until they stop taking it applies in the Spring as well. If they need it they'll eat it, if they don't they won't.)

LESSON LEARNED: We ended up removing the piece of weatherstripping at the top edge of the above picture, as it was encouraging mold in the roof. The ants can't get past the bees from that side. The roof was scraped as mold-free as possible, wiped with white vinegar and replaced. No further mold has appeared.

August 06, 2012

How to use a Hive Top Feeder: Part I

First, prepare the feeder.
1. Before placing a wooden hive top feeder on your hive, fill it with water and wait for it to leak.
2. After the cracks have formed, dump the water out, dry the feeder and shove glue into the cracks.
3. Repeat steps 1 and 2.
4. Repeat steps 1 and 2.
5. Once all the cracks are glued and re-glued, coat the entire feeder with waterproof urethane.*
6. Coat with urethane again, inside and out, until the entire feeder is glossy even if you've purchased satin finish.
You are now ready to use the feeder. Whether your bees will use it is an entirely different story. Stay tuned for more on the Warré hive in the picture above.

BTW, this is an Ashforth-type feeder, which you can read about on Dave Cushman's site.

*We used Titebond III Ultimate Wood Glue and Minwax Helmsman Spar Urethane, both recommended by the manufacturer of the hivetop feeder. At least he got one thing right. The glue and urethane are top-notch.

January 17, 2012

Primer: Getting Bees

How you might get your honeybees. No proselytizing, just the facts.

In order of cheapest/easiest to the most expensive/least likely way for urban beekeepers to get started:

Swarm: a spinoff. If a colony is super healthy in the late spring/summer, it splits in two. The queen flies off with about half the bees to start a new colony elsewhere. Someone has to catch it. Usually free.

Package: usually about 10,000 loose bees and a queen in a box with mesh sides. No comb, but the bees get a can of syrup. Usually around $100.

Nuc: a fully functioning hive in miniature. Made up of a few frames or top-bars with comb with bees in all stages, some honey and pollen, plus an actively laying queen. Usually over $100. Remember, it's bees and equipment.

Split: an artificial spinoff. A beekeeper splits one colony to make two colonies. S/he takes enough from the parent colony to, at minimum, create a nuc. May or may not be queenless. Can be done Spring through Fall. Plan on spending a couple hundred bucks if the split's made with more than 5 combs.

Complete Colony: I have yet to meet a beekeeper who was willing to part with a live colony, but it does happen. It's usually beekeepers coming back from almond pollination that have deeps to get rid of.

October 24, 2011

Winterizing your bee hive for winter. Colorado temps drop Wednesday night!

Still don't know what the tiny green things are. Will let you know if they've changed when we harvest the BOB and leafcutter bee cocoons. Seems like a good "snow day" thing to do, so stay tuned...
This is an email I just received from backyardhive.com, the company from which we bought our original hive. If you would like to receive emails like this, send a request to the email at the bottom of the post.
The Colorado weather forecast calls for a sudden drop in temperature this Wednesday night. The temperatures will go from 70°F today, 50°F tomorrow and then into the teens by Wednesday night. You can do some winterizing steps to help out your bees.

The bees normally cluster in a tight ball between the combs to keep warm in freezing temperatures. Since the bees have not been in a cluster due to this warm weather, the sudden drop in temperature may catch them by surprise and they may not all get into a full cluster as nicely as they should.

So you can help them out by:

1: Insulating:
Put some insulation, a warm blanket or the like on your hive Tuesday night. You can always get a better setup once the weather warms back up again. Also placing a roof on the hive adds extra warmth. Blue insulation board can be used underneath the roof for added insulation. Stacking straw bales around the hive can be used for when we are deep into winter temperatures and the days and nights are staying cold.

2: Moving the Falseback:
You can move your falseback, placing it behind the last full comb in the hive, at the back of the hive. If you have some partially drawn out combs or empty combs at the back of the hive you can place the falseback in front of these combs. Moving the falseback forward creates a smaller area that the bees have to keep warm.

3: Feeding Your Bees:
If your hive is only about half full of combs, you can feed your bees. Refer to the article, Winter Feeding in a Top Bar Hive, on our website for more details on how to do this. If the bees have filled up ¾ of the hive with combs, it is not necessary to feed them.

4: Reducing the Entrance:
 This is an important topic! Since we are seeing different weather patterns and anomalies in the weather, we no longer sell the entrance reducers. Placing an entrance reducer in now can over heat the hive once the temperatures warm up again. There needs to be circulation in the hive when the temperatures reach the 60s or 70s.

You may not need to reduce down the entrance of the hive if the bees have done it on their own with propolis. Some colonies won't have propolised their entrance and you can help them out by placing some straw, twigs or grass, over part of the entrance. The bees will be able to push out straw, twigs or grass if they need to, regulating the entrance opening. You may need to replace the straw, twigs or grass if they push it out when the weather warms up and they still have not propolised their entrance. Just keep a watch on this.

If you do feed your bees, remember that once the weather warms up again, the honey in the dish, inside the hive, attracts all kinds of robbers. Bees from other hives, yellow jackets, etc. Your bees should be able to fend off these robbers. But if you have a weak hive, a low number of bees or they have not propolised their entrance you can help them out by using the straw, twigs or grass method.

Lastly we will have wooden covered blue insulation panels available next week if you are wanting an alternative to the “cozy cover” we currently offer on our website. Look for the email when those will be available for purchase.

Please check out the articles on our website: http://www.backyardhive.com
They offer more detail and have pictures: Winter Feeding in a Top Bar Hive and Insulating your Hive

Happy fall to everyone and their bees!
Karen, Corwin and the BackYardHive Team
karen@backyardhive.com

March 09, 2009

When to Do What for One's Bees

We've found only one book specific to Top Bar Beekeeping, which we'll review shortly, but it's amazing what you can find on the Internet. Marty Hardison's "The Appropriate Bee Hive" is chock full of information, such as The List.

Keep in mind, Marty's hives are in Colorado and New Mexico, both at altitude and both extremely dry environments. We've gotten less than a half-inch of rain so far this year! Your apiary's timing may be different depending on your growing season. Instead of March, you might think "when the crocus start blooming." And instead of September, you might think "after the First Frost but before a Hard Freeze."


Marty Hardison's Seasonal Management: THE LIST [My notes in square brackets]
March
Inspect colony for a queen. Spring clean. Feed if needed. [Have fondant or candy ready. February and March is when most colonies starve.]

April
Be sure brood chamber is not honey bound. Harvest or move honey if needed. Feed if needed. [syrup]

May
Prepare for swarm season. Remove entrance restrictor when weather has begun to warm. Remove false back so that bees have enough space. Harvest all old honey. [indicator is dandelion bloom].

June
Check to see that the bees have enough room. Harvest fresh honey if space is needed. Remove drone brood from overwintered colonies. Check condition of queen if colony is not prospering. Consider requeening. Consider splitting if more than half of the hive is full of brood. [Super strong colonies when the Russian Olives start to bloom, in preparation for the main (Linden) nectar flow.]

July
Harvest honey. Remove drone brood. If more than half the hive is brood, consider a split. [Requeen. By splitting a second-year colony in late July, you create a queenless half with a break in brood that can ensure you have at least one colony in your third year. Without brood, the mite population cannot grow. Learn more about nucs and splits here: http://bit.ly/1bTfDOn]

August
Harvest honey. Remove drone brood. Organize combs for overwintering. [The Queen will begin to slow egg-laying but any Varroa present will keep on going. Remove as much varroa as possible; MAQS, drone cull or smoke w/sumac bobs, juniper bark and/or chaparral leaves.]

September
Harvest the last of the season's honey. Put on entrance restrictor. Move false back forward giving bees less space in which to winter. Determine whether feeding is necessary. [2:1 if overnight temps are still over 50°F, fondant if colder.]

October through February
Check on hives occasionally to be sure a cow hasn't overturned them or the wind hasn't blown the lid off. Don't open a hive unless absolutely necessary; the bees have a difficult time resealing the hive in cold weather. [We wrap our hives Halloween weekend.]