Showing posts with label vermicomposting. Show all posts

May 03, 2023

2 posts in 1: Beekeeping Mentorship & Figgy Problems

News on the beekeeping front: I'm waiting for the Southeast Virginia Beekeepers Guild to set us up with a a beekeeping mentor! Being matched with one with topbar or Warré hive experience is, not surprisingly, the challenge. And on top, we've asked for a place to put our hive/s since our condo doesn't allow hives on our patio. While waiting patiently as swarm season passes us by, I'm dealing with a little figgy problem.

Last spring, I was gifted a small Olympian fig tree. Now I've got problems. Thousands of them.

It appeared as if it had been recently dug up and potted to be given away, i.e., it didn't have a great root system and was loose in its pot. Spring turned into summer, summer into fall. Lil Figgy pushed out some small leaves but never grew bigger. It just sort of was. I worried it wasn't strong enough to make it through winter, and breathed a sign of relief when it broke dormancy. I actually was just thinking 2023 might be the creep year (out of sleep, creep, leap) but then I saw a knobby root sticking out of the soil. Digging a bit down, I saw another, and another, and then strings of them. I googled "root knots on fig" and, unlike those on legumes, these are bad.

Root-knot galls on fig tree roots.

Root-knot galls are caused by harmful nematodes. Root Knot Nematodes (RKN) are microscopic worms that are common in sandy soils. RKN feed on roots with needle-like mouthparts, and parasitizing fig trees is a known problem. Particularly when container-grown, the root system can become damaged to the point where the plant cannot properly absorb water and nutrients. 

Even though the galls harbor egg-laying adults, Lil Figgy has too many affected roots to just cut off the galls. Instead, I think the best I can do is give it clean potting mix and some nutrient-rich organic matter, something RKN do not like. Thousands of root-knot juveniles can be present in just a tablespoon of soil, so I removed as much soil as possible before repotting it. I watched a video on YouTube that gives me hope that my treatment plan will eliminate the galls.

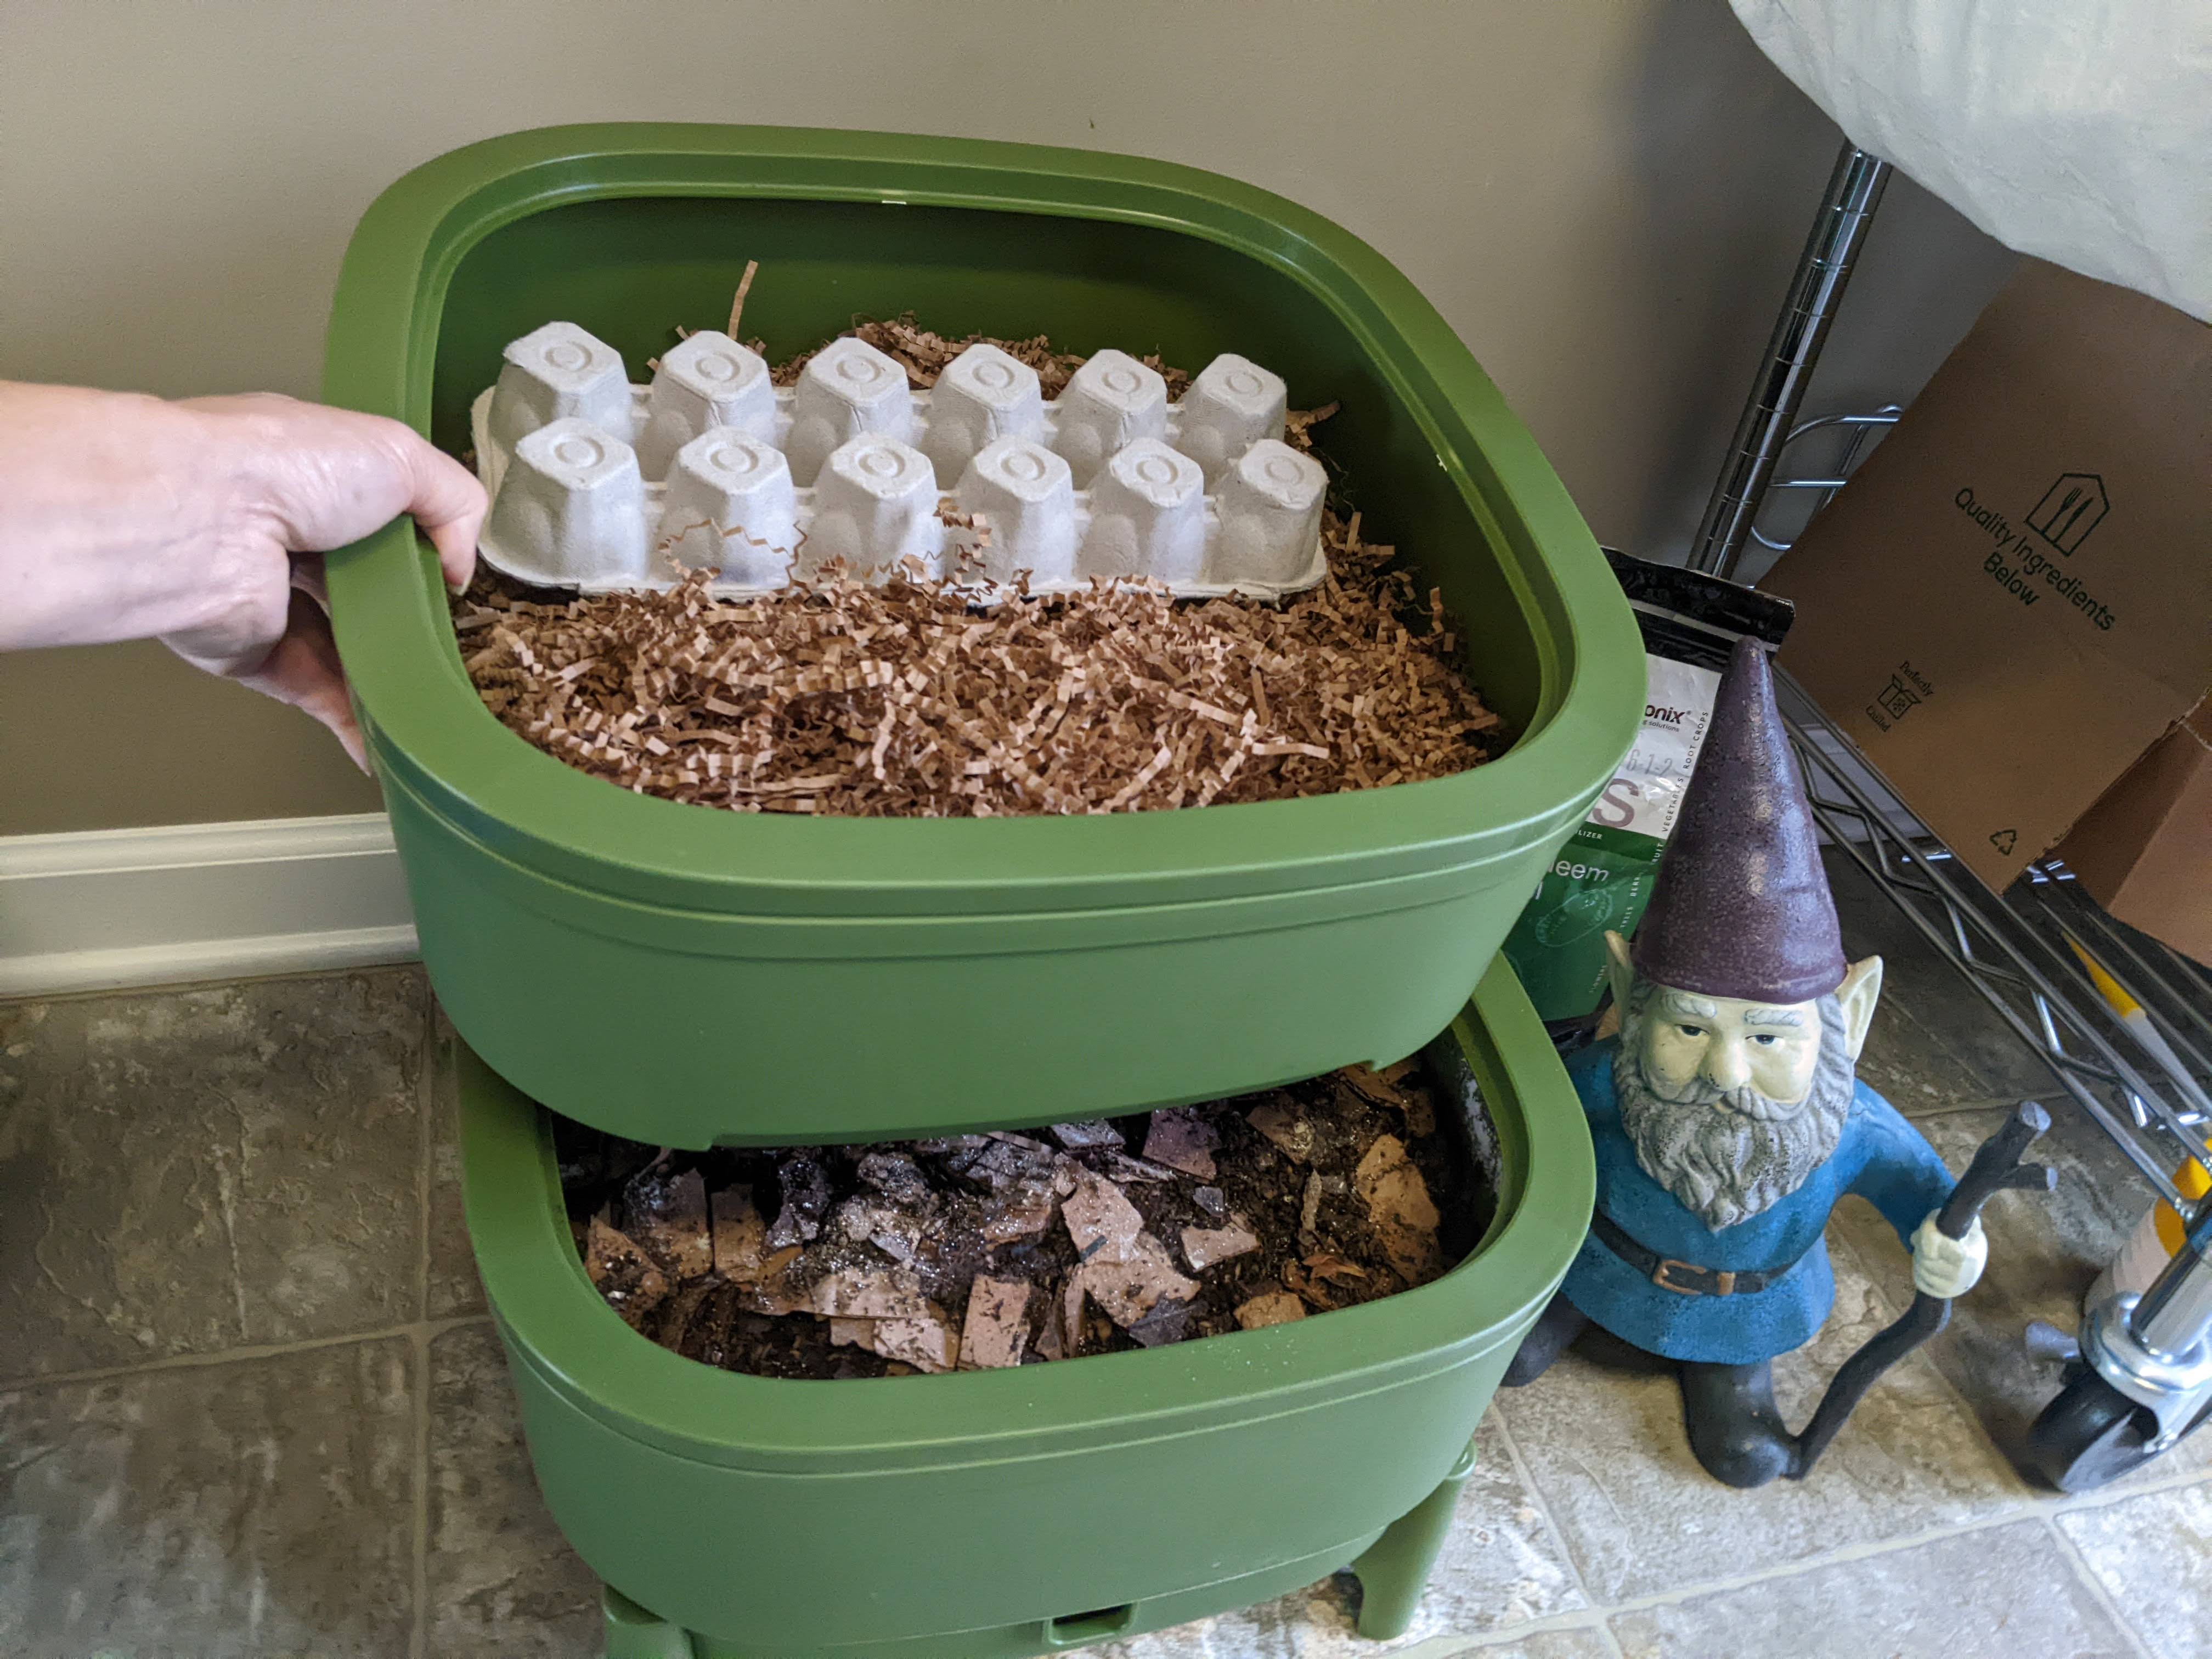
Earthworm Castings and Neem Seed Meal

The video says worm castings are "The Cure for Nematodes" but, honestly, I have no idea how to get castings out of my Wow Worm Farm. Since I needed castings and rich organic matter, the easiest thing to do was just use finished vermicompost as is. I opened the worm bin, and as usual worms immediately retreated from the light. I fluffed up the top two inches and went to the grocery store. By the time I got back, most of the worms had burrowed down, allowing me to scoop up mostly worm-free vermicompost. I turned in some neem seed meal, another natural nematicide, and repotted the fig into a smaller pot. Now if it grows well, I'll know quickly. And when roots come out the bottom and it's ready to pot up, I'll find out if the treatment worked. My hope is to see the galls gone, and you can be sure I'll share if it does!

Olympian fig tree, freshly repotted in finished vermicompost and looking pretty good.

The PittMoss as worm bin bedding is working really nicely. The worms process it in to a fine dark compost. Contrary to other bloggers' experience, I find torn cardboard takes a long time for the worms to break down and it constantly molds.

Fresh PittMoss bedding vs Finished compost

My one issue with PittMoss is that it is sold in nonrecyclable plastic bags. I'm doing my best to go plastic-free so have started to collect egg cartons. If you've got a heavy-duty confetti shredder, the paper pulp bits make a great worm bedding that breaks down faster than shredded newspaper.

January 08, 2023

Gnats, Nadiring, and Neem

If you're just finding my blog, this indoor worm bin was started around Halloween. The working tray at the top of the photo was filled with moistened PittMoss Prime, a peat-free newsprint-based medium. The worms are really happy in it. Torn up cardboard? Not so much. I've read many posts saying worms love corrugated cardboard, but I never see worms on it and it's gone moldy, which isn't bad per se but I don't like it.

What I like even less are the fungus gnats and composting mites in the bin. In an outdoor bin these cohabitants would not necessarily be pests. In an indoor scenario, they are. I've lost a couple of houseplants to gnats, and I'm tired of them landing on my dinner plate.

The Wow Worm Farm in parts. It's really a neat little system.

I decided to nadir today, hoping the worms will drop down into the clean bedding but the gnats will stay in the top tray. As before, I inoculated the fresh bedding with neem seed meal but I did not moisten it at all this time. Not that they can't survive it, but gnats don't like dry. Anyway, I buried about a pint of kitchen waste in the center. Vegetable scraps produce quite a bit of moisture so I figure it'll provide what the worms need. The worms are probably pretty hungry because I haven't fed them in about 3 weeks. Reducing the amount of decaying matter seems to have helped knock down the mite population, but obviously worm activity is down, too. I'm hoping the worms' egg cases can lay dormant longer than the fungus gnat eggs can, and that I waited long enough. Maybe I should've waited a month. Ugh, I'm simply at my wit's end with these gnats!

Reassembling the Wow Worm Farm. From left to right, the base with filter to keep the worms and compost out of the leach tray, the top level where all the action is currently, the just-filled-with-bedding tray, the lid.

I am a little worried because now that I'm using both levels, I won't be able to leave the lid off. Managing moisture is key to beating the gnats and mites. Both thrive in a moist environment. If it weren't winter, I'd leave the bin outside with the lid off so the gnats could fly away and the light would drive the worms down.

Since I can't leave it open in my kitchen, I am really hoping the neem seed meal kills the gnats. If it doesn't I'll have a two-tray gnat farm. I've read it works against a plethora of pests but I haven't seen anything specifically about composting mites. I treated both trays with a generous layer of the powder and will let you know what happens.

UPDATE: The gnats are gone! I harvested the tray of finished (?) vermicompost and am running a 1-tray system, gnat-free.

December 17, 2022

Mites!

The similarities between a colony of worms to a colony of bees continues. 

My worm bin has mites. They look very much like varroa mites, only smaller! About the size of the period at the end of this sentence. Most Internet sources say the mites are harmless, that they're a common co-habitant. My issue with them is I found a pile of them about 5 feet away from the worm bin which, I remind you, is in my kitchen. Had a bag of potting mix not been there for them to congregate under, who knows where I would've found them? I need to get them under control.

Enlarged video of a mite on a egg carton (ideal bedding BTW).
Even more enlarged photo of a mite on a paper towel, head to the left.

Where did they come from in the first place?

From Jim's Worm Farm. Despite negative reviews, and the website stating, "We strive to maintain insect/mite free orders! However,…" I was definitely wishfully thinking when I bought worms from them. So the lesson is, if you're establishing a worm bin, find a friend who has a mite-free vermicomposter who can give you a quart of worms in finished compost. A nuc as it were.

If you click on this photo of my Worm Farm's leach tray, the barely visible dark specks are composting mites.
How to control composting mites?

Mites are actually normal in a worm bin population, but they can become overpopulous. Apparently, too much moisture and mites proliferate. Indeed, I find them in the leach tray, which collects excess moisture (i.e., liquid in your leach tray means you're not managing moisture properly).

Besides adding additional Neem Bliss, here's everything I'm doing and why, in order of what I think will be most effective:

  1. Manage moisture so nothing is in the leach tray.*
  2. Don't feed anything in the cucurbit family, which seems to be the mites' fave. (Big oops on the double dose of butternut squash skin.) 
  3. Reduce pH. Acidity brings mites. Eggshells can provide all the calcium carbonate the soil needs, which helps to lower the soil's pH level and make it more alkaline as opposed to acidic. 
  4. Sprinkle diatomaceous earth over the bedding. DE supposedly is deadly to mites but not harmful to earthworms. However, it only works when it's dry so won't be effective unless I properly manage moisture.
Forget trapping. Sticky traps are minimally effective. Akin to using drones to collect varroa mites, supposedly mellons/squash can be used to collect the composting mites to then be tossed outside. I steamed a butternut and left a pile of guts on a yogurt lid in the upper tray overnight. Very little interest, so mellons/squash being highly attractive is Internet myth.

The bottom tray is where all the action is: worms, mites and gnats feeding on moist bedding and kitchen scraps. I'm using the top tray like a Warré hive quilt. It is filled with dry bedding that is wicking moisture from the colony below. I'm dismayed that there's quite a few mites running around up there.

UPDATE: the mites congregate on the lid, effectively acting as a trap so I could knock down the population by simply cleaning the lid periodically. Managing moisture by setting the working bin askew on the leach tray is a must. No leach, no mites.

What's Neem Bliss?

Besides earthworms and mites, fungus gnats just adore a moist medium of decaying plant matter. They definitely found my worm bin but a couple of doses of Neem Bliss (neem seed meal) appears to be resolving the problem. Neem Bliss successfully eradicated an outright infestation in a bag of Fort Vee compost stored in my garage. The gnats originated in another bag of potting mix on the other side of the garage. If anyone tells you that gnats are weak flyers, then you might also like to know that wolverines make great house pets. Anyway, I simply thoroughly mixed in about a half-cup of the neem seed meal and set the bag outside for three weeks.** Not one gnat to be seen now! I've been using the meal on some houseplants that have been quarantined for months and had way more success with Neem Bliss than anything else I've tried: sticky traps, DE, hydrogen peroxide, soapy water, Root Cleaner and Sacred Soil Tonic. It's been a real battle! Have you ever beaten a fungus gnat problem? How did you do it?


*"The notion that a worm bin should be producing leachate is one of the biggest misconceptions that I feel a need to correct. While all leachate isn’t stinky or hazardous (some may even be beneficial!), it is NOT a desirable by-product of a well-managed worm bin. It indicates too much watering, too much feeding, or not enough bedding added relative to food added." https://urbanwormcompany.com/vermicomposting-ultimate-guide-beginner-expert/

**The 3-week life cycle of fungus gnats is almost the same as varroa, and understanding it is critical to combatting the pests. See "A look under the cap.pdf".

You may also be interested in http://www.littlebigharvest.com/2014/07/controlling-mites-in-your-worm-bin.html

Also Good Reading: The Worm Farmer's Handbook by Rhonda Sherman - her explanation for high mite populations are a) too much moisture, b) overfeeding, and c) excessively wet or fleshy feed.

November 30, 2022

To Super or Nadir

The Worm Bin at 30 days

A quick update on the worm bin in my kitchen.

Neem Bliss is neem seed meal. Also known as "neem cake," it is reported to stimulate earthworm activity as well as kill fungus gnats. Preemptively, I inoculated the worm bin with it.

How much to feed?

I've been feeding the worms sparingly and it is disappearing, being processed by the worms. But the contents of the worm bin don't look any different – it doesn't look like compost. If anything, it looks the same but there's less of it. The bedding level has dropped, significantly, by a good 25% because the worms are processing the bedding as food. This is normal, bedding as food. Until I learn how much kitchen waste to give them, they'll keep eating the bedding. Not long from now, they'll be able to process as much as 1/2 lb per day!

How often to feed?

There are definitely more worms. They're thick where the food is. They're exploring where there's just bedding. They're moving through the holes in the bottom of the tray. I think they're searching for food so it's time to start feeding more than small handfuls of kitchen waste every few days. At a month old, there should be a decent microbiome established so I'm going to increase feeding to every other day. I'm even putting carrot peels (chopped up) back on the menu.

Where to feed?

I'm working clockwise. Food should be covered with bedding, so as I layer feed over the worms, I borrow bedding from an adjacent area. You can simply use the empty space for the next feeding and keep backfilling, but I've borrowed enough to leave an entire quadrant void. The population isn't quite ready for that much food so I filled it with crumbled leaves. Autumn is pretty amazing here, with an absolute abundance of oak trees.

Fallen autumn leaves are an excellent food for worms. When fully composted, it's called leaf mold. It is a terrific soil conditioner, but I don't want to wait a year for it. The worm bin will reduce the wait time to mere months. 

Should I super or nadir?

When the tray is filled with finished compost, what then? Borrowing two beekeeping terms, the options are to super (new tray on top) or nadir (new tray underneath). If I super, I'll need to provide a ladder. (Laddering is a technique that beekeepers use to get bees to move into another hive body.) If I nadir, the worms will just drop down. Which way would they prefer to move, up or down? Occasionally, one or two worms will climb up the walls of the tray, but I consistently find them underneath it. So I am inclined to nadir. At the rate the worm bin is establishing itself, I should have an answer for you in another 30 days.

November 11, 2022

A New Colony

…of worms!

This post if for the 86% of my IG followers who said, "I want worms to eat my garbage, too!"

Back in the 90s, we had a good landlord who let me put a composter in the corner of the property. It was shaded, though, and there were only two of us generating waste, so it never got "hot" enough to really work. I'd seen Mary Appelhof's "Worms Eat My Garbage" somewhere and gave worm composting in my apartment a go. I filled a Rubbermaid bin with shredded newspaper, added worms, and fed them kitchen scraps. The bin worked pretty well. Until I made two mistakes which sent me running out the door and dumping the entire contents into the outdoor composter. Afterwards, that thing kicked butt!

It worked so well, we ran two full size composters in Colorado. Now we live in a condo with no place for even one! I've had to peel carrots, potatoes, shuck corn over the garbage can. Painful! It was time to revisit the indoor worm bin. The memory of running out of the house with cold, gooey worms stuck to my hands still vivid, I wanted something I knew was designed well, compact, and portable for our next move. And having just invested in a new suite of stainless appliances, it also had to look stylish in my kitchen. So here it is, my Wow Worm Farm from Gardener's Supply Company with lots of pictures. 

I hope you find my experience getting started with vermicomposting helpful.